Blazingly-fast User Interface Testing for Fun and Profit
The user interface is the only part of your app that your users actually see and interact with, therefore it is important to make sure that it works. The world's greatest networking layer or expertly crafted data-storage solution will all be for nothing if your UI is broken. Despite this, view testing is often overlooked by developers, and for good reason - it can be far easier said than done, particularly given the tools specifically provided to do it. Today we will explore a solution that makes testing your UI quick and simple, using the tools you already use for testing the business logic of your app.
The Not Very Good, the Bad, and the Ugly
For years, the state-of-the-art in automated UI testing on iOS has been a smorgasbord of frustration, pain, and shattered dreams. Whether directly using the Apple-provided XCUITest APIs on their own, or perhaps augmenting these by sprinkling something exotically awful over them such as Appium or Calabash like a true connoisseur of mediocrity, the story is always the same - an initial wave of excitement, followed swiftly by the crushing disappointment of a flakey, constantly-breaking test suite.
The reasons for this are perfectly simple - the UI automation framework on iOS is built on top of the noble and excellent accessibility layer baked in to the operating system. Whilst this layer makes for a great accessibility experience, it falls short in providing a stable API for interacting with applications programatically. Desperately searching for XCUIElements is the name of the game, and what worked last week may not work this week after a minor and unrelated change to your UI. Hack after hack is added to mend things, until eventually developers give up altogether.
As if this wasn't bad enough, automated UI tests are painfully slow to run. Need to test a view that lives 4 scrolls, 2 button taps and 3 navigation pushes away from the first screen in your app? Have fun setting fire to your CI build minutes each time you run your tests. Yes there are hacks like fiddling with CALayer's speed property to make things faster, but this only partially alleviates the problem.
The final cherry on this miserable cake is the extra dev effort required to manage the environment in which the tests run. Automated UI tests are black box tests that run the entire application, meaning if your app depends on a remote backend you're either going to have to set up an entire separate environment to point your app to when running UI tests (and account for network latency while the tests run), or else stub-out your app's entire network layer to provide it with consistent dummy data across runs of your test suite. This is a significant extra engineering overhead.
As if that wasn't enough, there is another bonus nugget that comes along shortly after the aforementioned disasters have been visited upon a dev team. The inherit unreliability caused by the problems listed above leads as day follows night to a fickle test suite that will only do one thing reliably - produce false negatives i.e tests that fail when the application hasn't actually broken. This inevitably destroys trust in the test suite, further disincentivising the investment of any more time in testing the application's user interface. All of that hard work ends up being ignored - what a waste!
To sum up, UI automation testing on iOS is hobbled in the following ways:
- Automation APIs not up to the task
- Test failures caused by changes to code unrelated to the code being tested
- Slow to run
- Huge amounts of dev effort to set up and maintain the test environment
- False negatives leading to lack of trust in the testing system
So, how do you solve a problem like UI testing?
Unit Tests to the Rescue
By contrast, unit tests are incredibly quick to run, don't require the rigmarole of setting up environments to host the testing suite, and test discrete sections of code and so are not prone to breaking in response to unrelated code changes.
But can you unit test your UI layer? The simple answer is yes you can! Views and view controllers are objects just like any other, so they can be tested in the same way.
A Practical Example
To illustrate how we can write unit tests for custom views, we will start with a simple project that allows for a list of employees to be browsed. An employee can be selected to view their details:
Specifically, we will focus on the view at the top of the employee details screen:
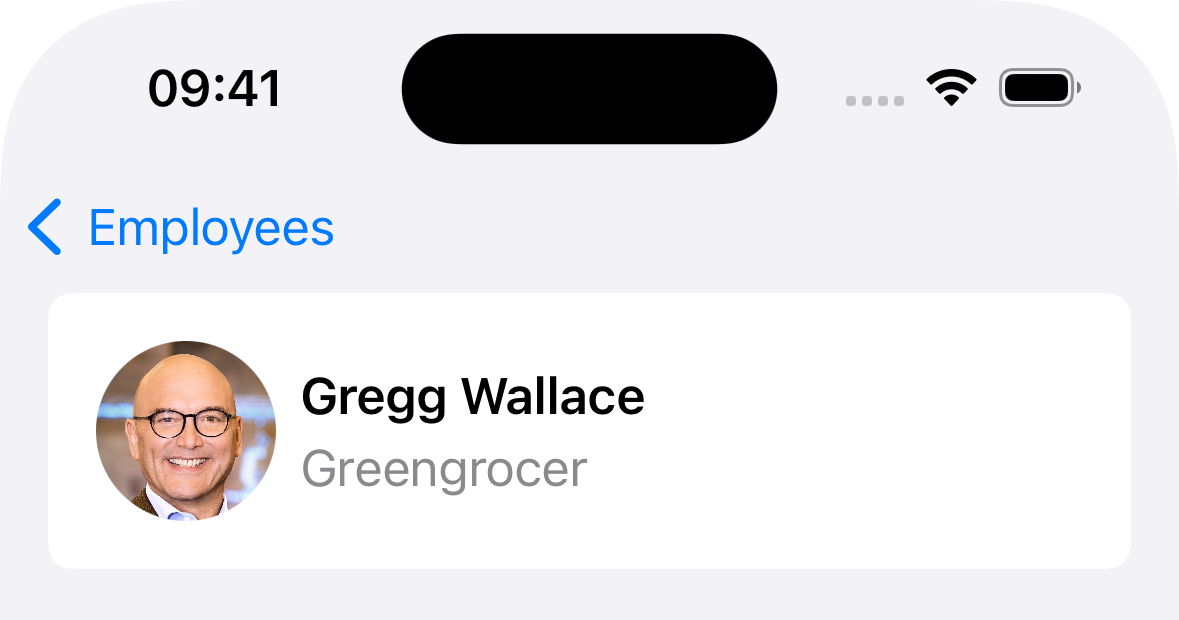
This view, designed to show an overview of the employee, contains two labels and an image view - one label for their name, one for their job role, and an image view to display their photo. Let's have a look at how we might go about building this view:
import UIKit

/// The view used to show the overview of an employee.
final class EmployeeOverviewView: UIView {

    /// The image view used to display the employee's photo.
    let photoImageView: UIImageView = {
        let photoImageView = UIImageView()
        photoImageView.translatesAutoresizingMaskIntoConstraints = false
        photoImageView.contentMode = .scaleAspectFill
        photoImageView.clipsToBounds = true
        photoImageView.layer.cornerRadius = 30
        photoImageView.addConstraints([
            photoImageView.widthAnchor.constraint(equalToConstant: photoImageView.layer.cornerRadius * 2),
            photoImageView.heightAnchor.constraint(equalTo: photoImageView.widthAnchor)
        ])
        return photoImageView
    }()

    /// The label used to display the employee's name.
    let nameLabel: UILabel = {
        let nameLabel = UILabel()
        nameLabel.translatesAutoresizingMaskIntoConstraints = false
        nameLabel.font = .preferredFont(forTextStyle: .headline)
        nameLabel.adjustsFontForContentSizeCategory = true
        nameLabel.adjustsFontSizeToFitWidth = true
        return nameLabel
    }()

    /// The label used to display the employee's job role.
    let jobRoleLabel: UILabel = {
        let jobRoleLabel = UILabel()
        jobRoleLabel.translatesAutoresizingMaskIntoConstraints = false
        jobRoleLabel.font = .preferredFont(forTextStyle: .body)
        jobRoleLabel.textColor = .secondaryLabel
        jobRoleLabel.adjustsFontForContentSizeCategory = true
        jobRoleLabel.adjustsFontSizeToFitWidth = true
        return jobRoleLabel
    }()

    override init(frame: CGRect) {
        super.init(frame: frame)
        backgroundColor = .secondarySystemGroupedBackground
        layer.cornerRadius = 8
        layer.cornerCurve = .continuous
        directionalLayoutMargins = NSDirectionalEdgeInsets(top: 16, leading: 16, bottom: 16, trailing: 16)

        addSubview(imageView)
        addSubview(labelsContainerView)
        addSubview(nameLabel)
        addSubview(jobRoleLabel)
    }

    /// Subview layout omitted for brevity.
}
This gives us a custom view containing the subviews required to display the overview details of an employee. However, using this view is a little cumbersome. Let's have a look at how code that makes use of one of these views would need to interact with it:
let employeeOverviewView = EmployeeOverviewView()
employeeOverviewView.photoImageView.image = UIImage(named: employee.name)
employeeOverviewView.nameLabel.text = employee.name
employeeOverviewView.jobRoleLabel.text = employee.jobRole
This puts far too much responsibility on the call site. Calling code has to know which properties of the employee should be set as the values on each of the overview view's subviews, and this will need to be repeated anywhere an EmployeeOverviewView is used. Even worse, we are leaking implementation details of the view and exposing the full public-APIs of our subviews to the call site. We do not intend for the labels' fonts, colours, text alignment etc to be modified, but with our subviews left as accessible properties, this is precisely what we've done.
Fortunately, there's a much better way to implement this view. Let's have another go:
import UIKit

/// The view used to show the overview of an employee.
final class EmployeeOverviewView: UIView {

    /// The employee whose details are shown.
    var employee: Employee? {
        didSet {
            photoImageView.image = UIImage(named: employee?.name ?? "")
            nameLabel.text = employee?.name
            jobRoleLabel.text = employee?.jobRole
        }
    }

    /// The image view used to display the employee's photo.
    private let photoImageView: UIImageView = {
        /// Omitted for brevity.
    }()

    /// The label used to display the employee's name.
    private let nameLabel: UILabel = {
        /// Omitted for brevity.
    }()

    /// The label used to display the employee's job role.
    private let jobRoleLabel: UILabel = {
        /// Omitted for brevity.
    }()
}
Much better. Our subviews are now private, and the employee details to be displayed are extracted in the employee setter, making our call site much simpler:
let employeeOverviewView = EmployeeOverviewView()
employeeOverviewView.employee = employee
Lovely! Next, let's have a look at how to test our overview view.
Wait, Not so Fast!
We just changed our view to make its subview properties private. As such, they cannot be accessed by outside code. But if this is the case, how can we write tests to check that the correct values are set on these subviews?
This problem has a simple two part solution. The first part is that whilst our subview properties themselves might be private, the subviews themselves aren't. How so? Every UIView has a subviews property. From this array, we can access any subview of a view. If we wanted to access the photo image view of our employee overview view in a unit test, we could do something like this:
let photoImageView = employeeOverviewView.subviews[0] as! UIImageView
XCTAssert(/* Some assertion involving the image view */)
Now, this works, but it is somewhat unreliable. If a code change is made to EmployeeOverviewView that changes the order of its subviews, then this test will fail even if the behaviour it tests hasn't changed. This brings us to the second part of the solution - subview identification.
One good thing that XCUITest gave us was an addition to the UIAccessibilityIdentification protocol, which has a property named accessibilityIdentifier. As the documentation states:
An identifier can be used to uniquely identify an element in the scripts you write using the UI Automation interfaces. Using an identifier allows you to avoid inappropriately setting or accessing an element’s accessibility label.
This identifier is not surfaced by the accessibility system, so any value you set will not be read out to a visually impaired user. It exists solely for the purpose of testing view code. As UIView conforms to UIAccessibilityIdentification, we can set an accessibilityIdentifier on any view we like. Let's take another look at the subview properties of our EmployeeOverviewView to see how this works:
import UIKit

/// The view used to show the overview of an employee.
final class EmployeeOverviewView: UIView {

    /// The image view used to display the employee's photo.
    private let photoImageView: UIImageView = {
        let photoImageView = UIImageView()
        /* … */
        photoImageView.accessibilityIdentifier = "photo_image_view"
        return photoImageView
    }()

    /// The label used to display the employee's name.
    private let nameLabel: UILabel = {
        let nameLabel = UILabel()
        /* … */
        nameLabel.accessibilityIdentifier = "name"
        return nameLabel
    }()

    /// The label used to display the employee's job role.
    private let jobRoleLabel: UILabel = {
        let jobRoleLabel = UILabel()
        /* … */
        jobRoleLabel.accessibilityIdentifier = "job_role"
        return jobRoleLabel
    }()
}
With these identifiers, we can now find our subviews in a way that is not dependent on their position in the subviews array:
let photoImageView = employeeOverviewView.subviews.first { $0.accessibilityIdentifier == "photo_image_view" } as! UIImageView
XCTAssert(/* Some assertion involving the image view */)
Now that we've solved the how part of testing our views, let's have a look at what we can test.
Testing Our View's Behaviour
We begin by creating a test case for testing our view:
import XCTest

final class EmployeeOverviewViewTests: XCTestCase {
    private var employeeOverviewView: EmployeeOverviewView!
    private var testEmployee: Employee!

    override func setUp() {
        super.setUp()
        testEmployee = /* Load employee data */
    }

    override func tearDown() {
        employeeOverviewView = nil
        testEmployee = nil
        super.tearDown()
    }

    private func givenAnEmployeeOverviewView() {
        employeeOverviewView = EmployeeOverviewView()
        employeeOverviewView.translatesAutoresizingMaskIntoConstraints = false
    }

    private func whenTheViewLaysOut() {
        employeeOverviewView.layoutIfNeeded()
    }

    private func whenTheViewEmployee(isSetTo employee: Employee) {
        employeeOverviewView.employee = employee
    }
}
We have set up a view for testing, along with some employee data to test it with. There are also functions to exercise the view's layout and to pass employee data to it.
Before we write our first test, let's add some helper functions in an extension of EmployeeOverviewView to make it easy to access its subviews:
import XCTest
import DJATesting

final class EmployeeOverviewViewTests: XCTestCase {
    /* … */
}

private extension EmployeeOverviewView {
    var imageView: UIImageView {
        subview(ofType: UIImageView.self, withAccessibilityIdentifier: "photo_image_view")!
    }

    var nameLabel: UILabel {
        subview(ofType: UILabel.self, withAccessibilityIdentifier: "name")!
    }

    var jobRoleLabel: UILabel {
        subview(ofType: UILabel.self, withAccessibilityIdentifier: "job_role")!
    }
}
Here we have defined properties that match the private subview properties of EmployeeOverviewView. We lookup the subviews using the accessibility identifiers we set earlier, using the DJATesting framework's helper functions for finding subviews by their accessibility identifier. If you do not wish to use the DJATesting framework then the technique described earlier will work, although it will not search recursively (i.e through subviews of subviews). The functions in DJATesting do search recursively.
Now that we can easily access our subviews, let's see what kind of tests we can write. First, we might like to make sure that the employee's image will be shown in a circle. We can do this easily with a test on the overview view's photo image view:
func testItConfiguresTheImageViewCorrectly() {
    givenAnEmployeeOverviewView()
    whenTheViewLaysOut()
    XCTAssertEqual(employeeOverviewView.imageView.contentMode, .scaleAspectFill)
    XCTAssertTrue(employeeOverviewView.imageView.clipsToBounds)
    XCTAssertEqual(employeeOverviewView.imageView.layer.cornerRadius, employeeOverviewView.imageView.frame.width / 2)
}
Next, how about checking that it shows the correct image? Easy!
func testItSetsTheEmployeeImageOnItsImageView() {
    givenAnEmployeeOverviewView()
    whenTheViewEmployee(isSetTo: testEmployee)
    XCTAssertEqual(employeeOverviewView.imageView.image, UIImage(named: testEmployee.name))
}
Now for the labels. We probably want to make sure that their settings reflect the design that we have been given, so let's do that:
func testItConfiguresTheNameLabelCorrectly() {
    givenAnEmployeeOverviewView()
    XCTAssertEqual(employeeOverviewView.nameLabel.font, .preferredFont(forTextStyle: .headline))
    XCTAssertEqual(employeeOverviewView.nameLabel.textColor, .label)
    XCTAssertEqual(employeeOverviewView.nameLabel.numberOfLines, 1)
    XCTAssertTrue(employeeOverviewView.nameLabel.adjustsFontForContentSizeCategory)
    XCTAssertTrue(employeeOverviewView.nameLabel.adjustsFontSizeToFitWidth)
}

func testItConfiguresTheJobRoleLabelCorrectly() {
    givenAnEmployeeOverviewView()
    XCTAssertEqual(employeeOverviewView.jobRoleLabel.font, .preferredFont(forTextStyle: .body))
    XCTAssertEqual(employeeOverviewView.jobRoleLabel.textColor, .secondaryLabel)
    XCTAssertEqual(employeeOverviewView.jobRoleLabel.numberOfLines, 1)
    XCTAssertTrue(employeeOverviewView.jobRoleLabel.adjustsFontForContentSizeCategory)
    XCTAssertTrue(employeeOverviewView.jobRoleLabel.adjustsFontSizeToFitWidth)
}
We've tested that they look right, but we also need to make sure that they show the correct data. Easy peasey:
func testItSetsTheEmployeeNameOnItsNameLabel() {
    givenAnEmployeeOverviewView()
    whenTheViewEmployee(isSetTo: testEmployee)
    XCTAssertEqual(employeeOverviewView.nameLabel.text, testEmployee.name)
}

func testItSetsTheEmployeeJobRoleOnItsJobRoleLabel() {
    givenAnEmployeeOverviewView()
    whenTheViewEmployee(isSetTo: testEmployee)
    XCTAssertEqual(employeeOverviewView.jobRoleLabel.text, testEmployee.jobRole)
}
OK, so we've tested that our subviews look correct and show the correct data. But that's only one part of a view's story. The other part is its layout. We can also test this with unit tests! We'll want to make sure that the employee's photo is aligned to the leading edge of the view in accordance with the layout margins. Simple:
func testItAlignsItsImageViewWithTheLeadingTopMargin() {
    givenAnEmployeeOverviewView()
    whenTheViewLaysOut()
    XCTAssertEqual(employeeOverviewView.imageView.frame.origin, CGPoint(x: employeeOverviewView.directionalLayoutMargins.leading,
                                                                            y: employeeOverviewView.directionalLayoutMargins.top))
}
The employee's name is supposed to be shown above their job role. Checking their frames allows us to assert this too:
func testItPositionsTheNameLabelAboveTheJobRoleLabel() {
    givenAnEmployeeOverviewView()
    whenTheViewLaysOut()
    XCTAssertGreaterThan(employeeOverviewView.jobRoleLabel.frame.minY, employeeOverviewView.nameLabel.frame.maxY)
}
There's One More Thing
Testing our UI doesn't just test that we show the correct data in custom views - it should also test app navigation. In our app, we have a list of employees that the user can choose from, and tapping on one navigates to a detail view controller showing the selected employee's details. All of this is testable with unit tests.
First, let's look at how our view controller layer is put together. It is worth keeping in mind two definitions from Apple's criminally under-read View Controller Programming Guide for iOS:
There are two types of view controllers:
- Content view controllers manage a discrete piece of your app’s content and are the main type of view controller that you create.
- Container view controllers collect information from other view controllers (known as child view controllers) and present it in a way that facilitates navigation or presents the content of those view controllers differently.
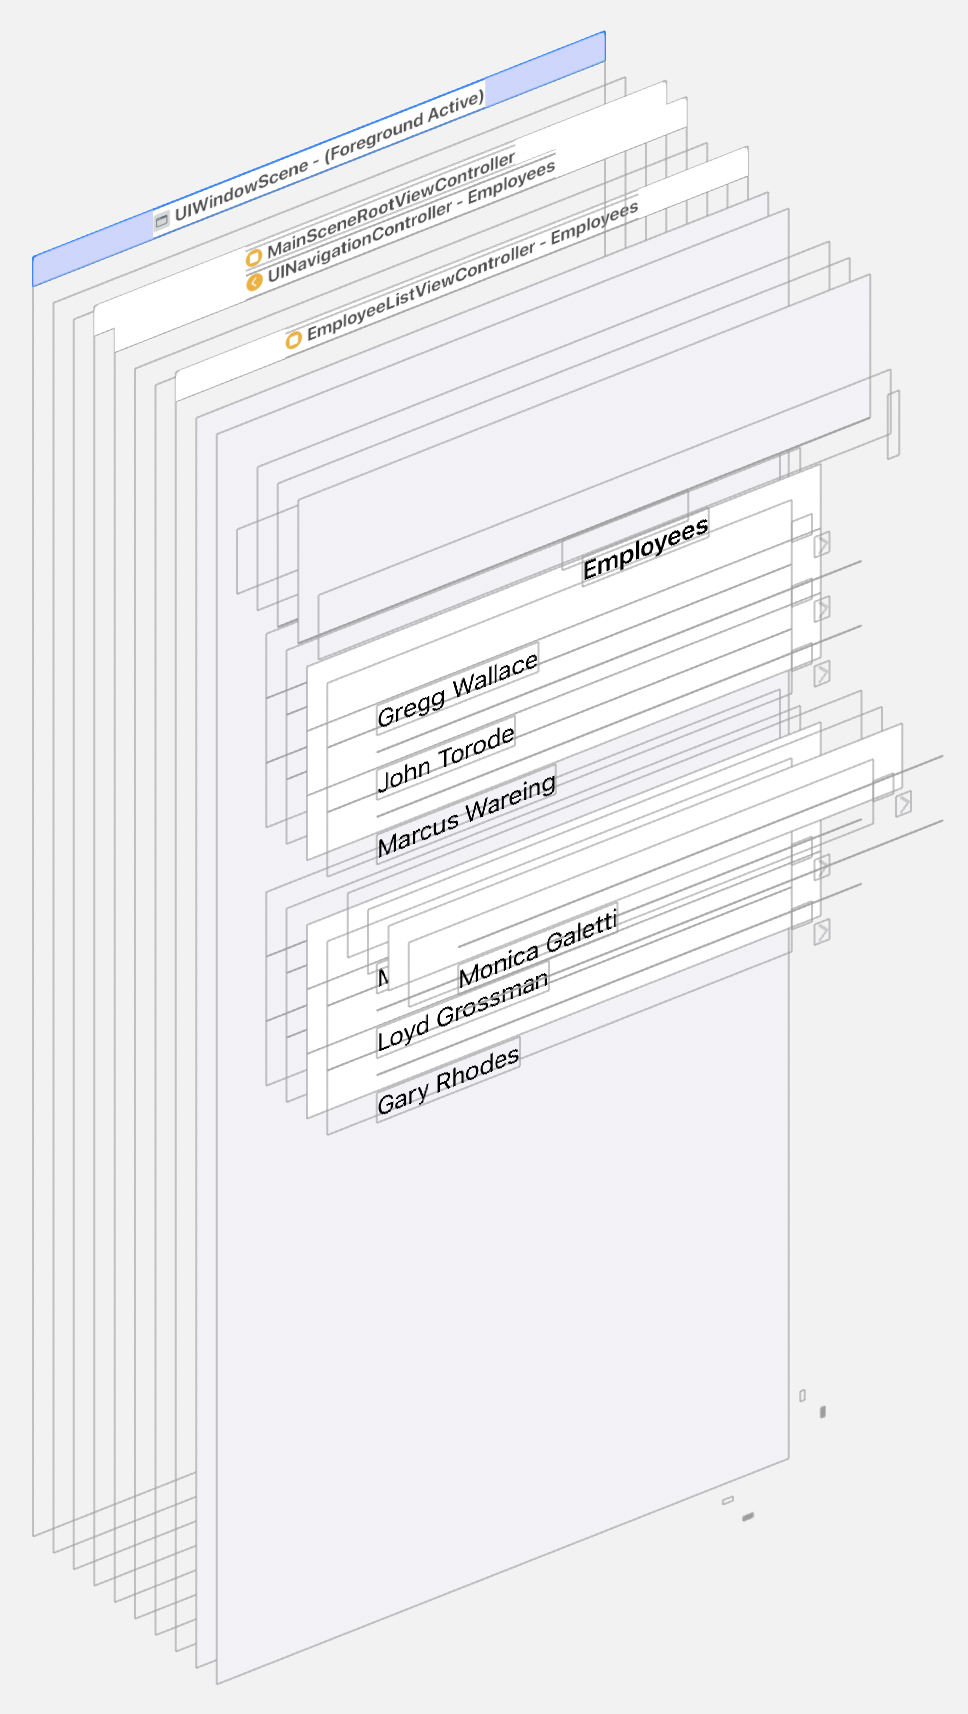
With this in mind, we can break our app down in to 3 view controllers. We have two content view controllers, which are:
EmployeeListViewController(for displaying the employee list)EmployeeDetailsViewController(for displaying an employee's details)
Our app's navigation is handled by a UINavigationController, which we embed in a container view controller named MainSceneRootViewController (which manages the UI in our app's main scene).
Here is the API for EmployeeListViewController:
import UIKit

/// The view controller responsible for showing the list of employees.
final class EmployeeListViewController : UIViewController {

    /// The delegate of the receiver.
    weak var delegate: EmployeeListViewControllerDelegate?
}

/// The protocol to conform to for delegates of `EmployeeListViewController`.
protocol EmployeeListViewControllerDelegate : AnyObject {

    /// The message sent when the user selects an employee from the list.
    /// - Parameters:
    ///   - employeeListViewController: The controller sending the message.
    ///   - employee: The employee selected by the user.
    func employeeListViewController(_ employeeListViewController: EmployeeListViewController, didSelectEmployee employee: Employee)
}
This is a very simple view controller. It simply shows a list of employees, and reports any selection made by the user to its delegate.
So far, so simple. But how can we test this view controller? As it turns out, it's not too dissimilar from how we tested out custom EmployeeOverviewView earlier. We start by creating a test case for the view controller:
import XCTest
import DJATesting

final class EmployeeListViewControllerTests: XCTestCase {
    private var employeeListViewController: EmployeeListViewController!
    private var employees: [Employee]!
    private var mockDelegate: MockEmployeeListViewControllerDelegate!

    override func setUp() {
        super.setUp()
        let employeeData = try! Data(contentsOf: Bundle(for: EmployeeListViewController.self).url(forResource: "Employees", withExtension: "json")!)
        employees = try! JSONDecoder().decode([Employee].self, from: employeeData)
        mockDelegate = MockEmployeeListViewControllerDelegate()
    }

    override func tearDown() {
        employeeListViewController = nil
        employees = nil
        mockDelegate = nil
        super.tearDown()
    }

    private func givenAnEmployeeListViewController() {
        employeeListViewController = EmployeeListViewController()
        employeeListViewController.delegate = mockDelegate
    }

    private func whenTheViewLoads() {
        employeeListViewController.loadViewIfNeeded()
    }

    private func whenTheViewIsLaidOut() {
        employeeListViewController.view.layoutIfNeeded()
    }

    private func whenTheCollectionViewVendsCell(atIndexPath indexPath: IndexPath) -> UICollectionViewCell? {
        employeeListViewController.collectionView.cellForItem(at: indexPath)
    }

    private func whenTheUserSelectsEmployee(atIndexPath indexPath: IndexPath) {
        employeeListViewController.collectionView.delegate?.collectionView?(employeeListViewController.collectionView, didSelectItemAt: indexPath)
    }
}

private final class MockEmployeeListViewControllerDelegate: EmployeeListViewControllerDelegate {
    private(set) var selectedEmployee: Employee?
    func employeeListViewController(_ employeeListViewController: EmployeeListViewController, didSelectEmployee employee: Employee) {
        selectedEmployee = employee
    }
}
As before, we have properties in our test case to hold on to the view controller being tested, we set up some test data, and also add helper functions to exercise parts of the view controller's behaviour, like vending collection view cells and handling selections made in its collection view. We have also created a mock delegate that we can use to write assertions about messages sent by the view controller to its delegate.
Next, we add an extension on the view controller, like we did previously when testing a custom view, to be able to access the view controller's collection view:
private extension EmployeeListViewController {
    var collectionView: UICollectionView {
        view.subview(ofType: UICollectionView.self, withAccessibilityIdentifier: "collection_view")!
    }
}
Now that we have all of that in place, we can start testing our view controller's functionality. We start by making sure that it shows the correct information to the user in its collection view:
func testItDisplaysTheCorrectNumberOfEmployees() {
    givenAnEmployeeListViewController()
    whenTheViewLoads()
    XCTAssertEqual(employeeListViewController.collectionView.numberOfSections, 1)
    XCTAssertEqual(employeeListViewController.collectionView.numberOfItems(inSection: 0), employees.count)
}

func testItDisplaysTheCorrectEmployeeData() {
    givenAnEmployeeListViewController()
    whenTheViewIsLaidOut()
    for (index, employee) in employees.enumerated() {
        let cell = whenTheCollectionViewVendsCell(atIndexPath: IndexPath(item: index, section: 0))
        let contentConfiguration = cell?.contentConfiguration as! UIListContentConfiguration
        XCTAssertEqual(contentConfiguration.text, employee.name)
    }
}
We now have tests to make sure that the collection view shows the correct number of employees, as well as displays the correct employee information.
Finally, we want to make sure that when the user selects an employee whose details they would like to see that the view controller sends the selected employee to its delegate:
func testItReportsTheSelectedEmployeeToItsDelegate() {
    givenAnEmployeeListViewController()
    whenTheViewIsLaidOut()
    whenTheUserSelectsEmployee(atIndexPath: IndexPath(item: 4, section: 0))
    XCTAssertEqual(mockDelegate.selectedEmployee, employees[4])
}
Great. We have now completely tested that our employee list displays the correct information, and allows the user to make a selection from the list of employees.
But how do we test that this actually navigates the user to the details about the employee that they selected? Remember earlier we mentioned that the app's main scene UI is managed by a view controller named MainSceneRootViewController, which has a navigation controller embedded as a child view controller. Let's have a quick peek at its implementation:
import UIKit

/// The view controller used to manage the main scene's UI.
final class MainSceneRootViewController: UIViewController {
    private let childNavigationController: UINavigationController

    init(childNavigationController: UINavigationController = UINavigationController()) {
        self.childNavigationController = childNavigationController
        super.init(nibName: nil, bundle: nil)
    }

    override func viewDidLoad() {
        super.viewDidLoad()

        let employeeListViewController = EmployeeListViewController()
        employeeListViewController.delegate = self

        childNavigationController.viewControllers = [employeeListViewController]
        addChild(childNavigationController)
        view.addSubview(childNavigationController.view)
        childNavigationController.view.frame = view.bounds
        childNavigationController.didMove(toParent: self)
    }
}
When the MainSceneRootViewController's view loads, it does 4 things:
- Creates an instance of
EmployeeListViewController - Becomes the delegate of the
EmployeeListViewController - Adds the
EmployeeListViewControllerto the navigation stack of its childUINavigationController - Adds the
UINavigationControlleras a child view controller
Now let's look at our MainSceneRootViewController's implementation of the EmployeeListViewControllerDelegate protocol:
// MARK: - EmployeeListViewControllerDelegate
extension MainSceneRootViewController: EmployeeListViewControllerDelegate {
    func employeeListViewController(_ employeeListViewController: EmployeeListViewController, didSelectEmployee employee: Employee) {
        let employeeDetailsViewController = EmployeeDetailsViewController(employee: employee)
        childNavigationController.pushViewController(employeeDetailsViewController, animated: true)
    }
}
It takes the employee selected by the user, uses it to create an instance of EmployeeDetailsViewController, and pushes it on to the navigation stack of the child UINavigationController.
So… how do we test all of this logic? Notice that the initialiser of MainSceneRootViewController has a parameter than can be used to supply the instance of UINavigationController to be used as the child navigation controller. This allows us to provide a mock navigation controller in our unit tests to assert the behaviour of MainSceneRootViewController in relation to its child navigation controller! Let's see how that looks:
import XCTest
import DJATesting

final class MainSceneRootViewControllerTests: XCTestCase {
    private var mainSceneRootViewController: MainSceneRootViewController!
    private var mockNavigationController: MockNavigationController!
    private var testEmployee: Employee!

    override func setUp() {
        super.setUp()
        mockNavigationController = MockNavigationController()
        let employeeData = try! Data(contentsOf: Bundle(for: EmployeeOverviewView.self).url(forResource: "Employees", withExtension: "json")!)
        testEmployee = try! JSONDecoder().decode([Employee].self, from: employeeData).first
    }

    override func tearDown() {
        mainSceneRootViewController = nil
        mockNavigationController = nil
        testEmployee = nil
        super.tearDown()
    }

    private func givenAMainSceneRootViewController() {
        mainSceneRootViewController = MainSceneRootViewController(childNavigationController: mockNavigationController)
    }

    private func whenTheViewLoads() {
        mainSceneRootViewController.loadViewIfNeeded()
    }

    private func whenTheUserSelects(employee: Employee) {
        mainSceneRootViewController.employeeListViewController(EmployeeListViewController(), didSelectEmployee: testEmployee)
    }
}
Again, we have a test case that sets up a view controller for testing, test data, and functions to exercise the view controller's functionality. Note the passing of an instance of MockNavigationController from DJATesting to the MainSceneRootViewController. This will allow us to assert behaviour involving the navigation controller.
First we want to make sure that our app shows the employee list when it loads. That's nice and simple:
func testItDisplaysAnEmployeeListViewControllerAsTheRootOfItsChildNavigationController() {
    givenAMainSceneRootViewController()
    whenTheViewLoads()
    XCTAssertEqual(mockNavigationController.viewControllers.count, 1)
    let childEmployeeListViewController = mockNavigationController.topViewController as! EmployeeListViewController
    XCTAssertIdentical(childEmployeeListViewController.delegate, mainSceneRootViewController)
}
Here we check that an instance of EmployeeListViewController is shown in the navigation controller, and that the MainSceneRootViewController is its delegate.
Next up we want to ensure that when the user selects and employee that we show the selected employee details in an EmployeeDetailsViewController:
func testItPushesAnEmployeeDetailsViewControllerWhenTheUserSelectsAnEmployee() {
    givenAMainSceneRootViewController()
    whenTheViewLoads()
    whenTheUserSelects(employee: testEmployee)
    let employeeDetailsViewController = mockNavigationController.pushedViewController as! EmployeeDetailsViewController
    XCTAssertEqual(employeeDetailsViewController.employee, testEmployee)
}
The pushedViewController property on MockNavigationController records the view controller passed to -[UINavigationController pushViewController:animated:]. By capturing this, we can assert that an EmployeeDetailsViewController is pushed on to the navigation stack with the correct employee details in response to the user selecting an employee from the list.
By adding a similar set of tests for the EmployeeDetailsViewController class (which can be seen in the sample project), we are able to test that the content of every screen in our app functions as expected and shows the correct data. We have also demonstrated that it is possible to test our app's navigation too, allowing us to assert that we have the correct behaviour in response to user interaction with the user interface that we have provided for them.
Are the Tests Fast?
One of the problems with UI automation test suites mentioned at the beginning of this article is that they are slow to run. We attempted to solve this problem with unit tests instead. Did it work? Let's have a look at a test run of our sample app and see:

That's both of the screens in our app, our custom view, and app navigation fully tested in 0.054 seconds.
Are the Tests Thorough?
It's important that UI unit tests are more than skin deep. We need to test that the correct data is displayed and that our app's navigation is given a good going over. Let's check our code coverage for an indication of this:

Our code coverage is 95%. However, digging in to the details shows that the missing coverage is all derived from there being no tests for the unimplemented -[UIViewController initWithCoder:] functions in our classes. As our app does not use Storyboards, this results in an effective code coverage rate of 100%.
Conclusion
At the beginning of this article we listed five problems inherent to automated UI tests on iOS. Have we managed to solve these with unit tests?
Automation APIs not up to the task
Other than making use of UIAccessibilityIdentification's accessibilityIdentifier we aren't using any UI automation APIs, so that's that bullet dodged.
Test failures caused by changes to code unrelated to the code being tested
We have solved this problem be discretely testing each part of our user interface. A change to EmployeeListViewController cannot break any of our EmployeeDetailsViewController tests as testing EmployeeDetailsViewController is not dependent on navigating to an instance of it via EmployeeListViewController, as it would be when using UI automation tests.
Slow to run
Huge amounts of dev effort to set up and maintain the test environment
No special test environment required 🤗
False negatives leading to lack of trust in the testing system
As code changes to one part of the app cannot break tests for another, we have also alleviated this problem in its entirety.
Don't forget to check out the sample project on GitHub to see for yourself how easy it is to unit test your iOS app's UI layer.