Building a Unit Tested, iCloud-backed Persistent Data Model with NSUbiquitousKeyValueStore
In modern iOS applications, users expect to be able to access their data across all of their devices. Thanks to the wide array of hardware produced by Apple, this can span from portable devices such as iPhone and iPad, all the way to our desktop computers and TVs. Many apps have their data supplied by back-end services, making shared access relatively trivial across multiple platforms. However, for apps that are responsible for managing data without such provision, we can build our own data stores on top of iCloud in order to serve our users with the information they expect on whichever device they choose to use.
iCloud Storage Options
There are four options available for storing data in iCloud:
- Key-Value Storage - This is the simplest form of data storage in iCloud. It allows for property-list object types to be stored along side a
Stringkey for later retrieval. - Document Storage - This provides for documents to be stored in iCloud, and is the go-to option for document based applications wishing to provide cloud-based access to the documents that a user has created.
- Core Data in iCloud - Does exactly what it says on the tin: allows Core Data backing stores to be synchronised with iCloud.
- CloudKit - The newest addition to iCloud's data storage capabilities, CloudKit provides interfaces for moving your app's data objects between a user's device and the application's iCloud container.
Today we will be focussing on the first of these options: Key-Value Storage, which is made available to use by the NSUbiquitousKeyValueStore object from the Foundation framework. We will use this object to add functionality to the Counties sample app (available on GitHub) to allow the user to mark individual counties as "favourites", and have their list of favourite counties synchronise with iCloud so that it is available on their iPhone, iPad, and Apple TV. Let's get started.
Adding iCloud App Entitlements
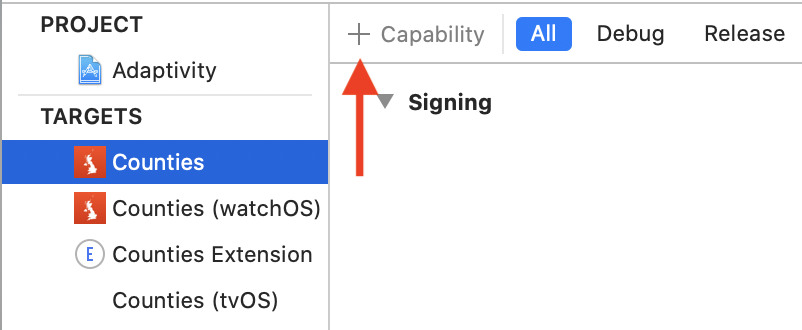
First of all, we have to configure our application to be able to store key-value data in iCloud. We start by going to the Signing and Capabilities tab of our app target, and clicking the "+ Capability" button in the upper-left corner:
From the menu that this button opens, we select the "iCloud" option. This adds the iCloud capability to our app:

Once this capability is added, check the "Key-value storage" checkbox.
If you only have one application target in your project, your iCloud setup is now complete. If however you have multiple app targets, perhaps because you support multiple platforms, you will need to repeat this step for each target. Also note that in order to share the iCloud Key-value data between your application on different platforms, each platform application target will need to have the same bundle identifier. If your apps do not have the same bundle identifier, but want to share iCloud data, you will need to designate one of your apps as the "primary" app in iCloud (more details on this here).
Building the Favourite Counties Model
Now that we have iCloud configured, we can go ahead and start building the model that we will use to store the user's favourite counties. All we need is a simple object with two functions - one to allow us to add a county to the favourites list, and one to remove a county from the favourites list. We will also need a readonly property to expose the list of the user's favourite counties. The code looks like this:
/// The object responsible for managing the list of the user's favourite
/// counties.
final class FavouritesController {
    private static let favouriteCountiesKey = "FavouriteCounties"

    /// The counties that the user has chosen as their favourites.
    var favouriteCounties: [County] {
        let counties = (ubiquitousKeyValueStore.array(forKey: FavouritesController.favouriteCountiesKey) as? [String])?.compactMap({ County.forName($0) })
        return counties ?? []
    }

    private let ubiquitousKeyValueStore = NSUbiquitousKeyValueStore.default

    /// Adds the given county to the user's favourites.
    /// - Parameter county: The county to add to the user's favourites.
    func add(county: County) {
        guard favouriteCounties.firstIndex(of: county) == nil else { return }
        ubiquitousKeyValueStore.set((favouriteCounties + [county]).sorted().countyNames, forKey: FavouritesController.favouriteCountiesKey)
    }

    /// Removes the given county from the user's favourites.
    /// - Parameter county: The county to remove from the user's favourites.
    func remove(county: County) {
        guard let countyIndex = favouriteCounties.firstIndex(of: county) else { return }
        var mutableFavourites = favouriteCounties
        mutableFavourites.remove(at: countyIndex)
        ubiquitousKeyValueStore.set(mutableFavourites.countyNames, forKey: FavouritesController.favouriteCountiesKey)
    }

    /// Synchronises the receiver's ubiquitous key-value store.
    func synchronise() {
        _ = ubiquitousKeyValueStore.synchronize()
    }
}
You may have noticed that we also have a function called synchronise. This is because NSUbiquitousKeyValueStore has a synchronize function that according to the documentation:
… [should be called] upon app launch, or upon returning to the foreground, to ensure that the in-memory key-value store representation is up-to-date.
As such, we add a synchronize function to our favourite counties object to allow for this synchronisation to be triggered at the appropriate times.
In order to store the user's favourite counties in the key value store, we store an array of the favourite county names against FavouritesController.favouriteCountiesKey. The array of county names gives us a serialisable representation of the user's favourite counties, and allows us to easily retrieve the corresponding counties later, by simply looking them up by name.
We now have a data model that allows us to store the user's favourite counties and have them synchronised across all of their devices. By simply using NSUbiquitousKeyValueStore we have created a data store that will synchronise with iCloud automatically, without us having to write any complicated data synchronisation code at all!
This is all well and good, but we have completely missed a critical step in our development of this feature. It is simply not acceptable in this day and age to build a data persistence layer that our users rely on without a comprehensive set of unit tests. We have a responsibility to our users to handle their data as carefully as possible. Any corruption of that data, or unexpected behaviour, will reflect very poorly on our app and greatly disappoint our users.
Testing the Model
First of all, we need to decide how to test our model. We have four behaviours that we need to cover - adding a favourite, removing a favourite, retrieving the favourites, and synchronising the value store. These behaviours are all supported by NSUbiquitousKeyValueStore, using its -setObject:forKey:, -arrayForKey, and -synchronize methods.
Now that we have identified the NSUbiquitousKeyValueStore methods that we rely upon, we can create a protocol containing them:
protocol UbiquitousKeyValueStorageProviding: AnyObject {
    func set(_ anObject: Any?, forKey aKey: String)
    func array(forKey aKey: String) -> [Any]?
    func synchronize() -> Bool
}
Once we have done this, we can add conformance of our protocol to NSUbiquitousKeyValueStore:
extension NSUbiquitousKeyValueStore: UbiquitousKeyValueStorageProviding {}Why would we do this? Because by extracting the functions from NSUbiquitousKeyValueStore that we rely upon in to a protocol, we can make our FavouritesController use any object that conforms to UbiquitousKeyValueStorageProviding. This means that we can exchange NSUbiquitousKeyValueStore for a completely different object in our tests - an object that we can inspect to verify that FavouritesController is sending the correct messages to at the correct time.
In order to do this, we need to modify FavouritesController to take an instance of UbiquitousKeyValueStorageProviding in its initialiser so that we can inject our testing object in our tests:
private let ubiquitousKeyValueStore: UbiquitousKeyValueStorageProviding

/// Initialises a new `FavouritesController` backed by the given ubiquitous
/// key-value store.
/// - Parameter ubiquitousKeyValueStore: The ubiquitous key-value store used
/// to persist the user's favourite counties.
init(ubiquitousKeyValueStore: UbiquitousKeyValueStorageProviding = NSUbiquitousKeyValueStore.default) {
    self.ubiquitousKeyValueStore = ubiquitousKeyValueStore
}
We make use of Swift's default parameters here to use NSUbiquitousKeyValueStore.default by default, simplifying usage of our class at the call site in application code.
Next, we create our testing implementation of UbiquitousKeyValueStorageProviding, with properties that allow us to inspect the values that are passed to it when its methods are called:
private final class MockUbiquitousKeyValueStorageProvider: UbiquitousKeyValueStorageProviding {
    private(set) var receivedObject: Any?
    private(set) var receivedKey: String?
    var mockArrayForKey: [Any]?
    private(set) var receivedSynchronizeMessage = false

    func set(_ anObject: Any?, forKey aKey: String) {
        receivedObject = anObject
        receivedKey = aKey
    }

    func array(forKey aKey: String) -> [Any]? {
        receivedKey = aKey
        return mockArrayForKey
    }

    func synchronize() -> Bool {
        receivedSynchronizeMessage = true
        return false
    }
}
Note that as well as intercepting the values passed to our object, we also have a readwrite array named mockArrayForKey that allows us to return whatever data we like from the -arrayForKey function, which allows us to test how our FavouritesController behaves with whatever data we would like to pretend is stored in the key-value store.
We can then set up our test harness like this:
final class FavouritesControllerTests: XCTestCase {
    private var favouritesController: FavouritesController!
    private var mockUbiquitousKeyValueStorageProvider: MockUbiquitousKeyValueStorageProvider!

    override func setUp() {
        super.setUp()
        mockUbiquitousKeyValueStorageProvider = MockUbiquitousKeyValueStorageProvider()
        favouritesController = FavouritesController(ubiquitousKeyValueStore: mockUbiquitousKeyValueStorageProvider)
    }
}
Here we are injecting our MockUbiquitousKeyValueStorageProvider in to the FavouritesController at initialisation, which allows us to test its usage of the key-value store. Using this technique allows us to write the following tests:
- testItCanSetACountyAsAFavourite
- testItCanAddACountyToAnExistingListOfFavourites
- testItCanRemoveACountyFromTheFavouritesList
- testItDoesNotAllowAddingTheSameCountyTwice
- testItIgnoresCallsToRemoveCountiesThatAreNotFavourites
- testItStoresCountiesInAlphabeticalOrder
- testItReportsTheUsersFavouriteCountiesCorrectly
- testItSynchronisesItsUbiquitousKeyValueStorageWhenRequested
The Benefits of Testing
The most obvious benefit of writing these tests is that we have verified that our code does what we think it does, which is especially important for code handling a user's data. However, there is an additional benefit which is not commonly understood, which is that by writing these tests we have also improved the documentation of our app by explicitly documenting its behaviour. The function signatures in the list above give a deeper description of how our FavouritesController behaves than its public interface. This is particularly useful when onboarding new team members to a codebase - simply reading the unit test signatures allows someone to get up to speed quickly with how elements of the system work. This saves the time of both the new and existing team members as one-on-one sessions to walk through the codebase become less necessary, and also gives new team members the confidence to start making additions and changes to the code, safe in the knowledge that they aren't breaking anything.
Conclusion
As we have seen in the above examples, adding iCloud support for your users' data can be easier than you think. NSUbiquitousKeyValueStore provides a simple API to a powerful feature - data synchronisation across devices. We have also seen that by extracting the public interface of an object in to a protocol, we can comprehensively test the behaviour of our application in even the most critical parts of our code. This benefits not just our end-users, who get a more robust app, but also the application developers, who benefit from significant documentation improvements to the codebase that they work with. To see further test examples visit the Counties sample app page on GitHub.