Fixing Multi-Level UINavigationController Menu Layouts in UISplitViewController on iOS 14
With the release of iPadOS 14, Apple introduced a new sidebar style for app navigation, designed to provide quick access to top level collections of application content. Sidebars allow users to quickly navigate to the data that they care about, and also provide a user interface that easily adapts to macOS when built using Catalyst. Building a sidebar-style app starts with using a UISplitViewController, so let's begin by taking a look at the new APIs added in iPadOS 14 to facilitate this new kind of app design.
Anatomy of a UISplitViewController
In iOS 14, the way we work with split view controllers has changed. One of the key new APIs is -[UISplitViewController setViewController:forColumn:], which works alongside UISplitViewController.Style to configure the view controllers displayed in the split view's columns. Below is an example of a split view controller configured using the .doubleColumn style, with a UITableViewController set in the .primary and .secondary columns, shown in Xcode's view debugger:
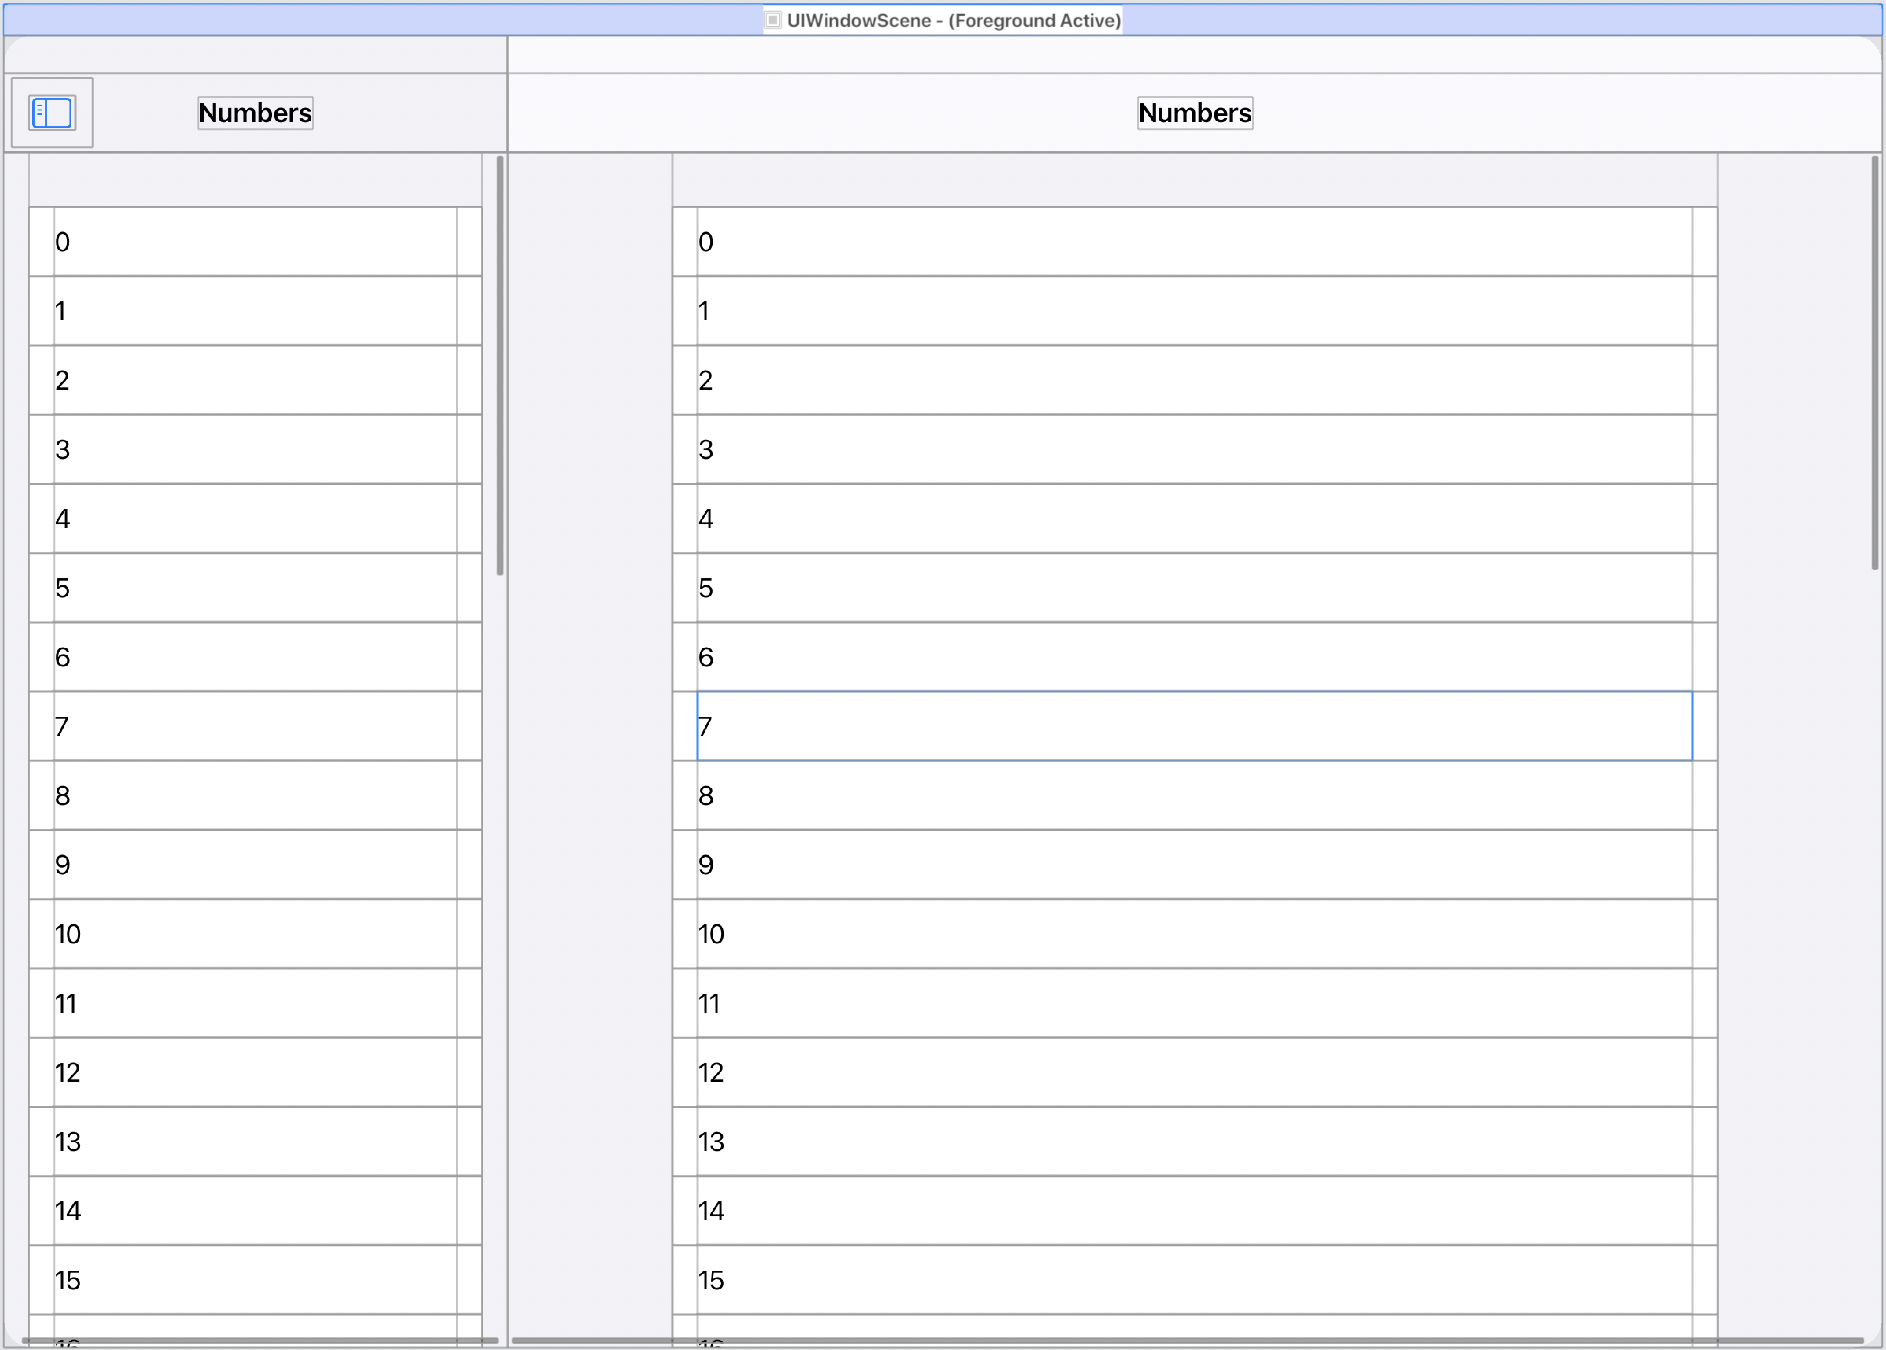
This is pretty much what you would expect - our table view controllers are added as children of the split view controller and positioned appropriately. Notice that UISplitViewController has also wrapped our table view controllers inside UINavigationControllers for us. This provides the navigation bars at the top of both columns, and provides navigation behaviour within the columns for free.
However, there is one aspect of this child view controller layout that is easy to miss. If we click on the "Show Clipped Content" button in Xcode's view debugger, we can see that the layout of our child view controllers is not quite what it first seemed:
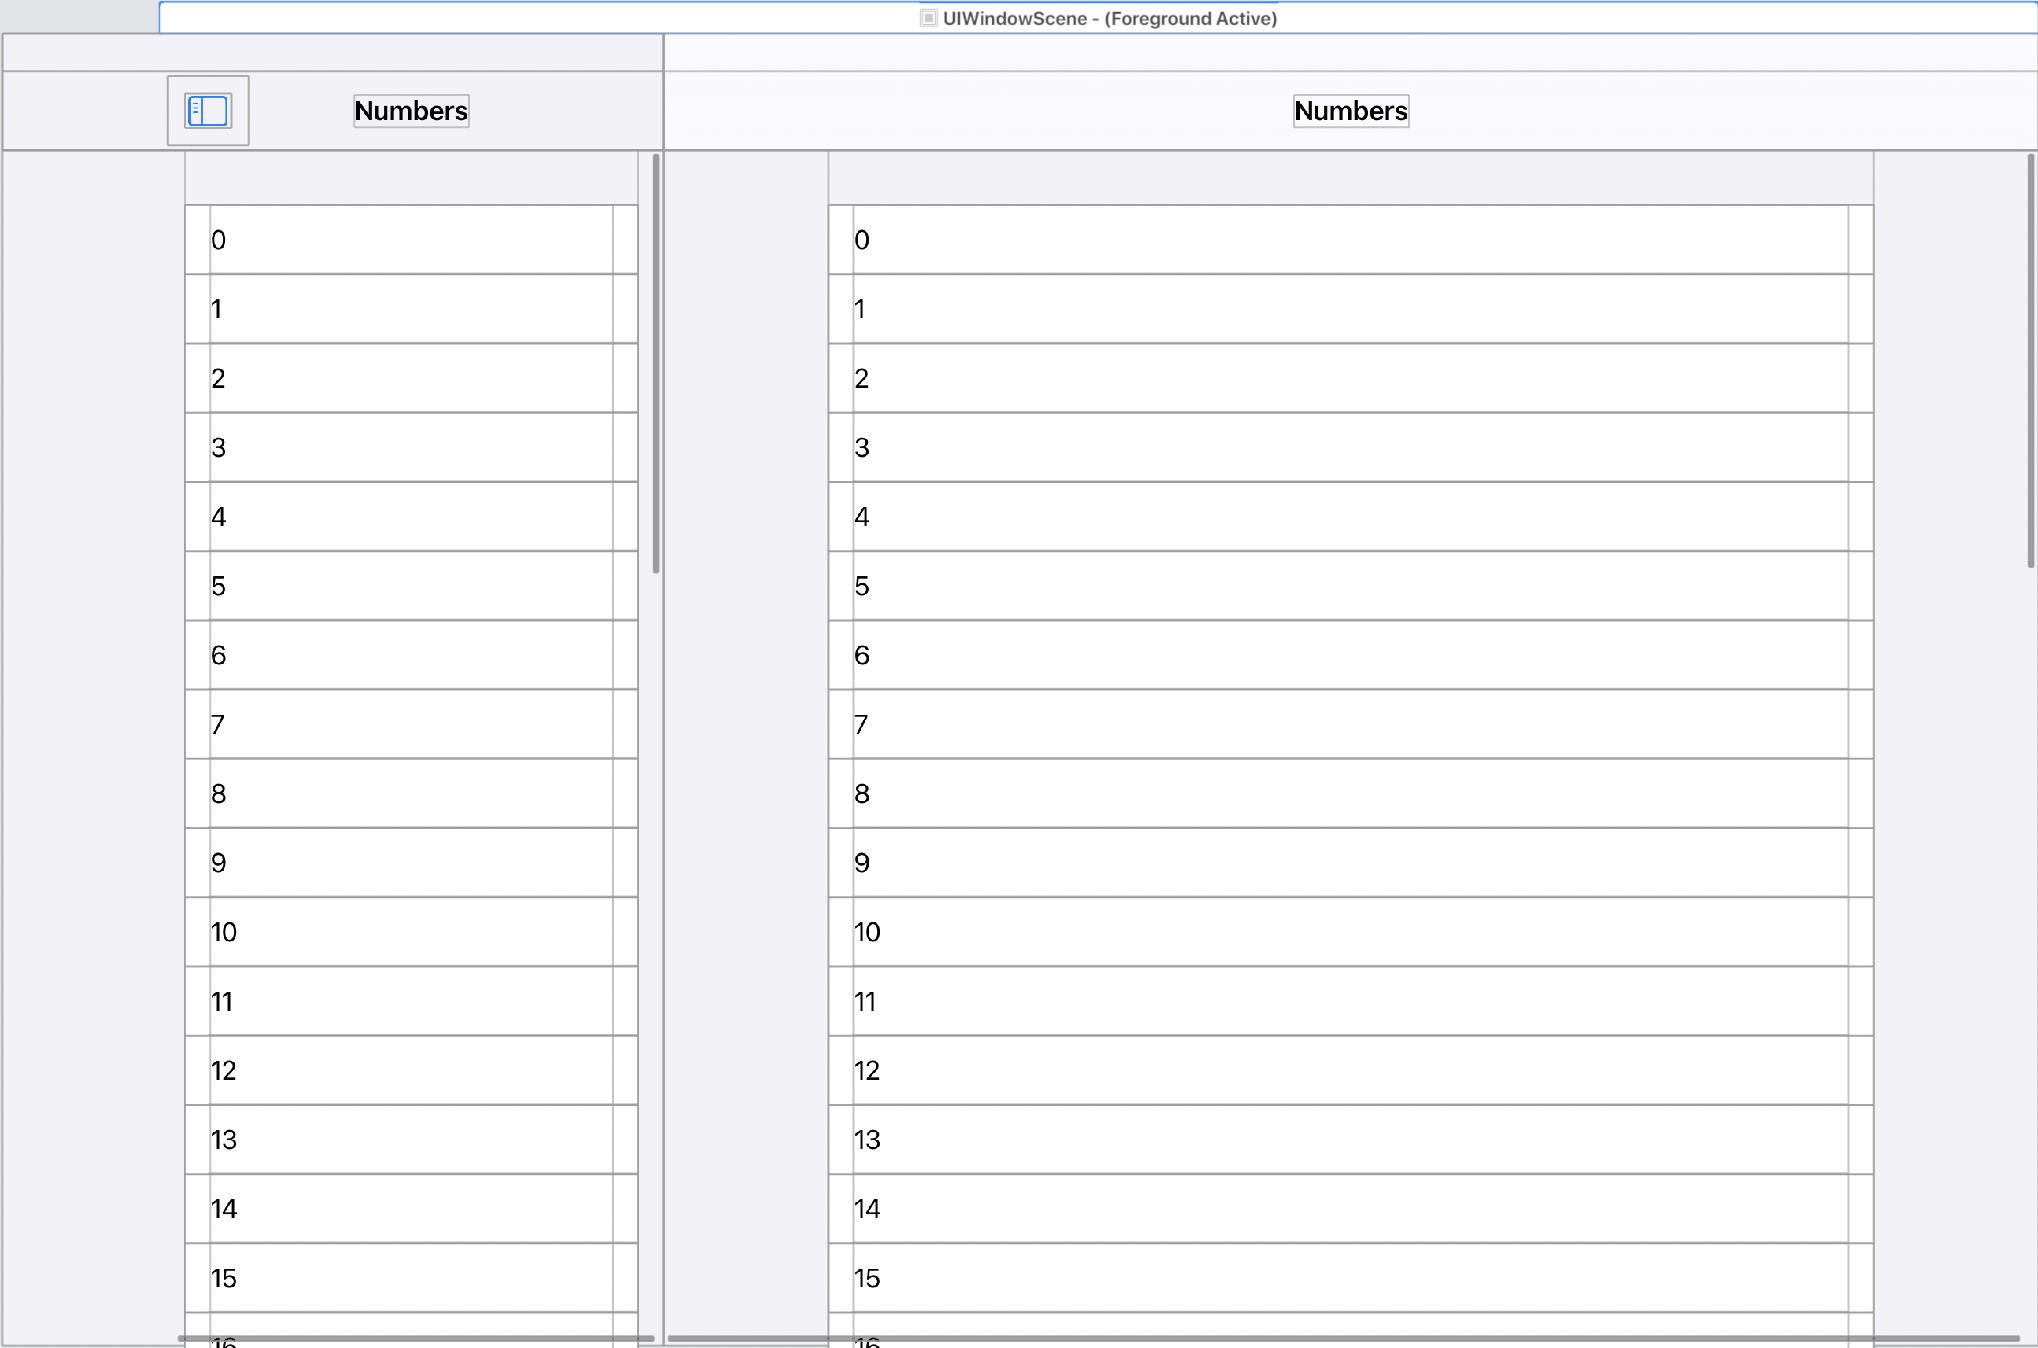
Our primary column view controller actually extends beyond the bounds of the split view controller's view. The view inspector for the primary column navigation controller confirms that this is the case:
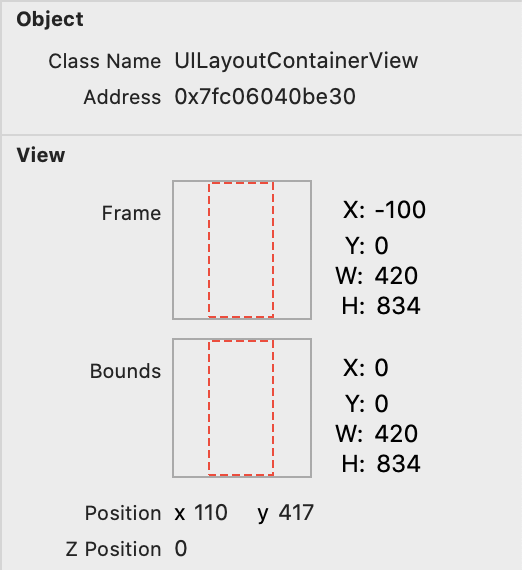
The primary column is laid out 100 points to the left of the split view. But why? Because the primary column can be hidden using the display mode bar button item that the split view manages in the column child navigation controllers. When the primary column is hidden off screen, it can be swiped back on to the screen using a screen-edge swipe gesture (if presentsWithGesture is set to true, which it is by default):
This gesture allows a certain amount of rubber banding as the user pulls the primary column back on to the screen. The extra 100 points of width added to the primary column allows the primary column to draw content that is visible during this rubber-banding effect. Handily, UISplitViewController configures the primary column's safe area insets to ensure that the primary column's content is correctly positioned within the column.
Self-managed Navigation Controllers Inside Primary Columns
In some scenarios, we may wish to manage a UINavigationController ourselves inside the view controller we set for the primary column. In the example we will be looking at today, our primary column view controller is PresentersMenuViewController, which has a child view controller which is an instance of UINavigationController. This is so that PresentersMenuViewController has a consistent navigation flow irrespective of whether it is contained in a split view controller as it is here, or, for example, is presented as a modal view controller. In both scenarios, a UINavigationController is present without the calling code having to wrap the menu in a navigation controller itself.
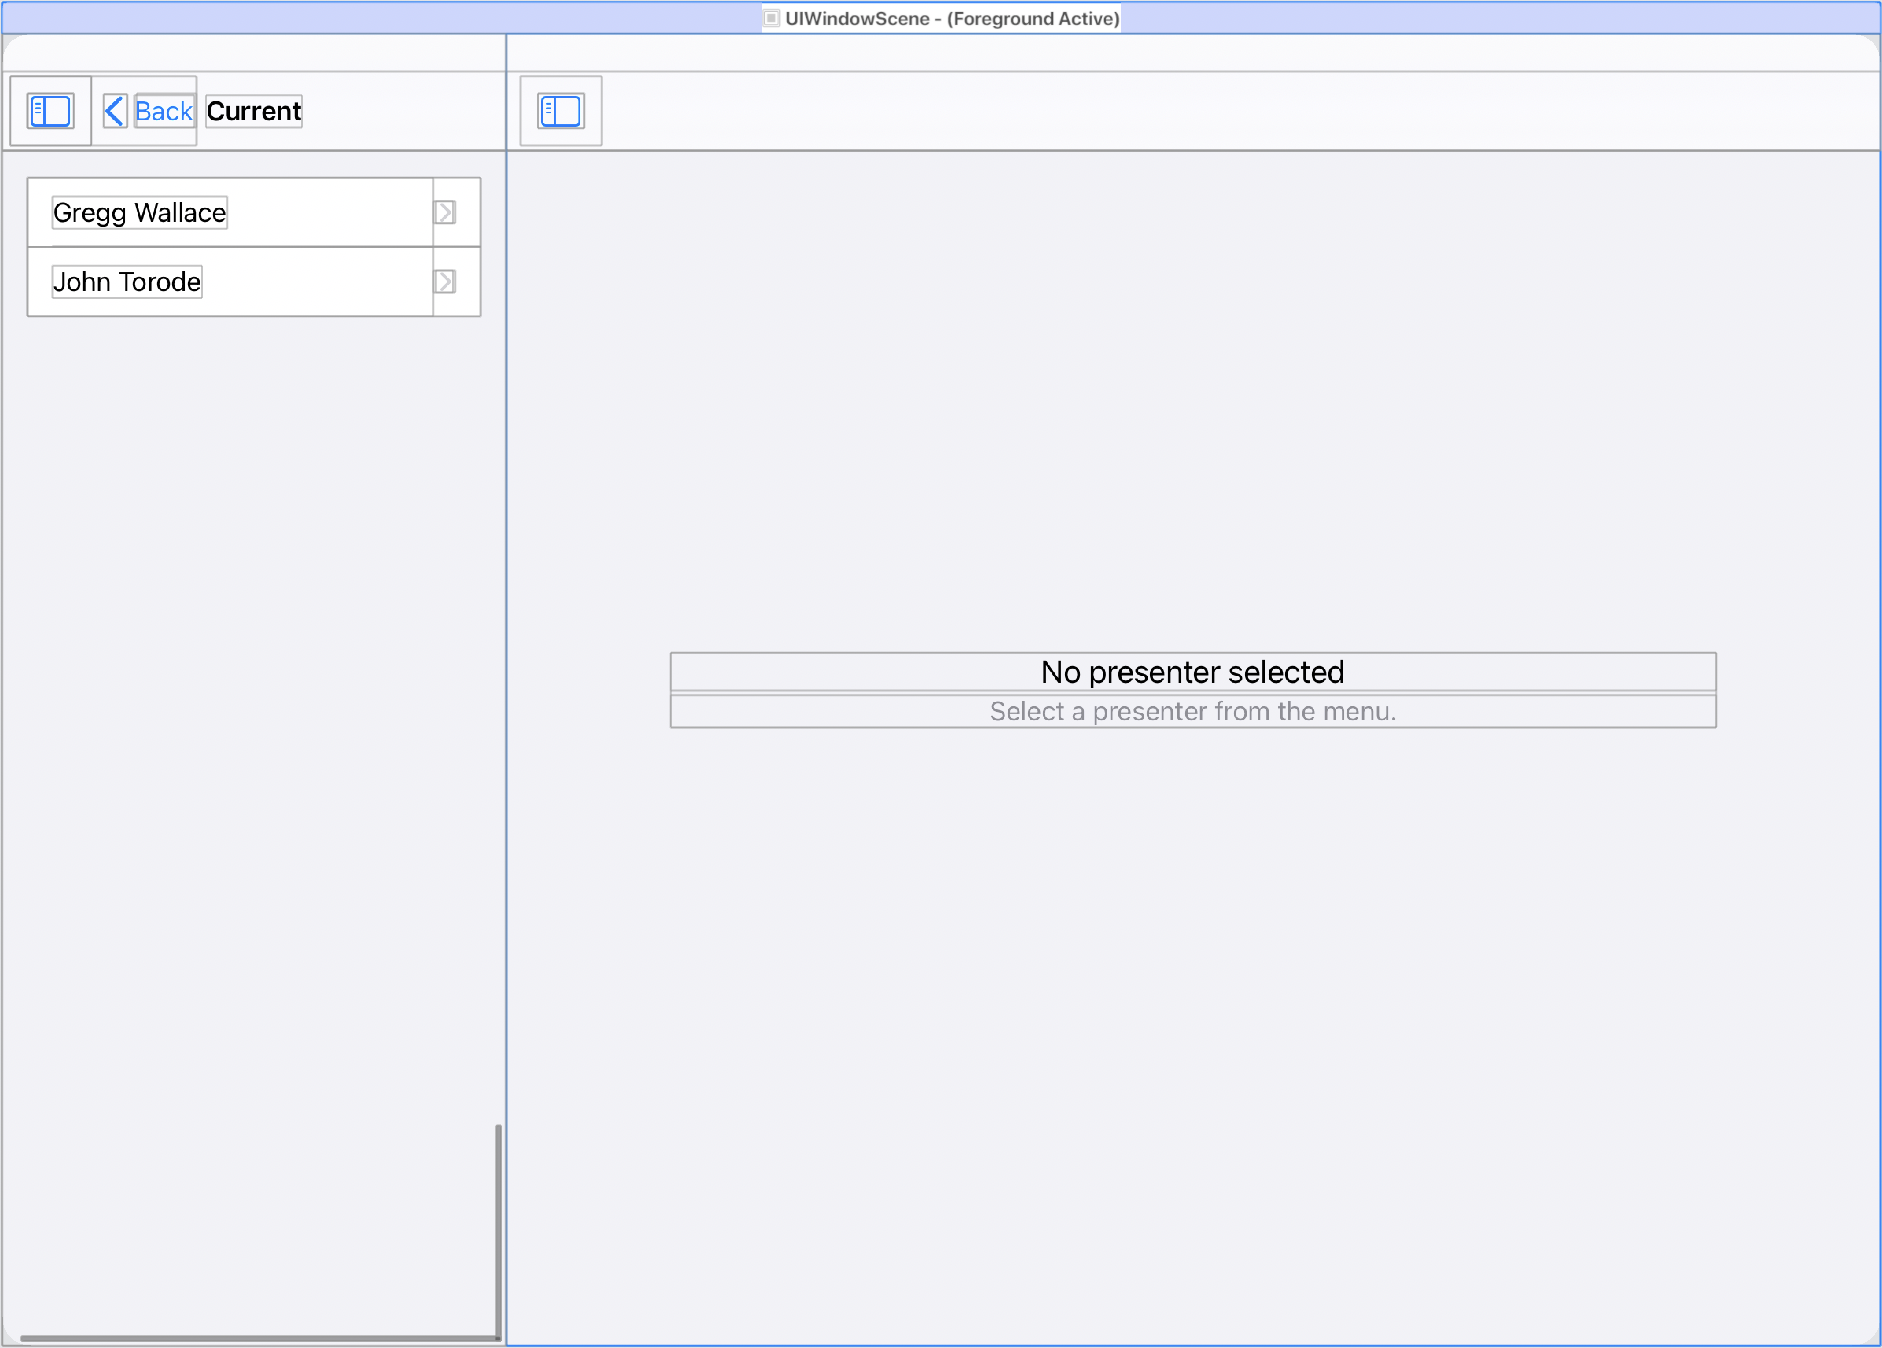
Let's run our example and see what happens:
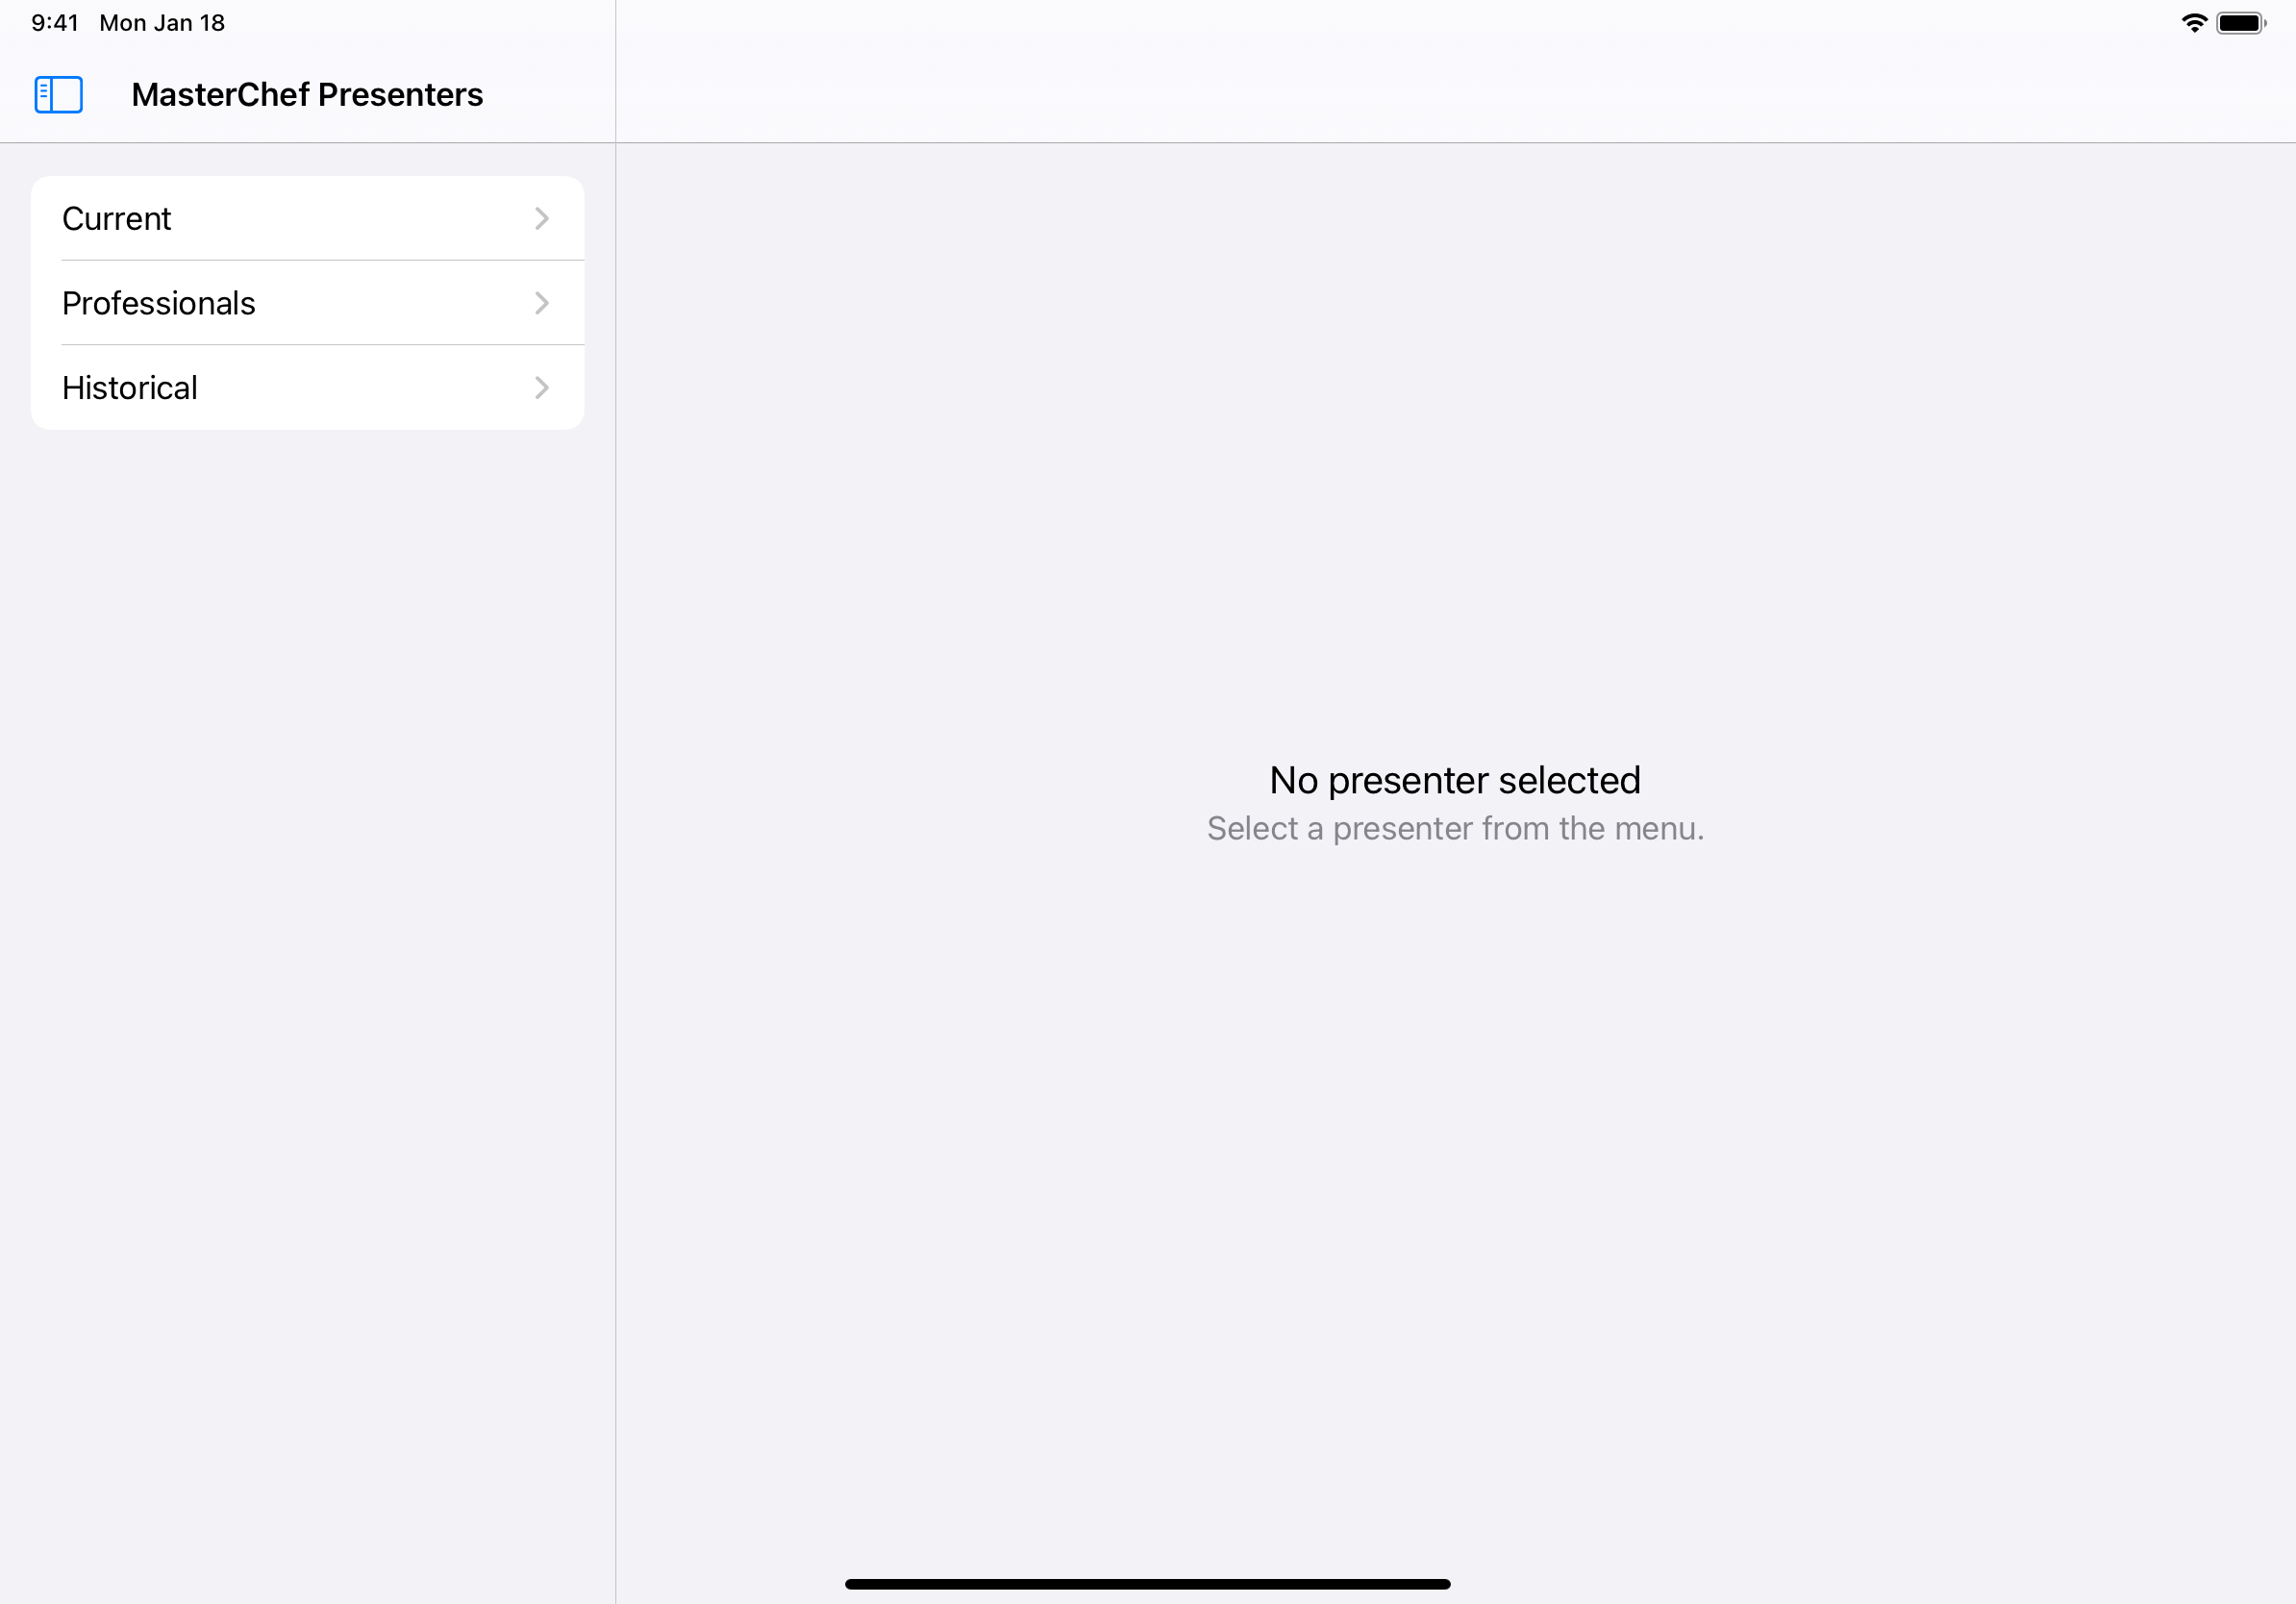
Nice. Our primary column view controller is displaying exactly how we expect. The safe area insets have been configured by UISplitViewController so that our menu list is positioned correctly, and only one navigation controller is shown in the primary column - we haven't ended up with our PresentersMenuViewController wrapped in a navigation controller by the split view controller.
How has this non-wrapping of our primary column view controller by a navigation controller been achieved? If we look at the documentation for UISplitViewController, it explains the scenarios in which it adds a navigation controller to the primary column, and in which it doesn't:
For the primary column, if you assign a
UIViewController(or custom subclass) whose first child view controller is aUINavigationController, the split view controller uses that navigation controller as the primary view controller for collapsing the interface and for placing the button to change the display mode.
In iOS 14, UIViewController gained a new method: -[UIViewController _wrapsNavigationController:]. If we set a break point in our presenters menu view controller's children property, we can see this function at work:
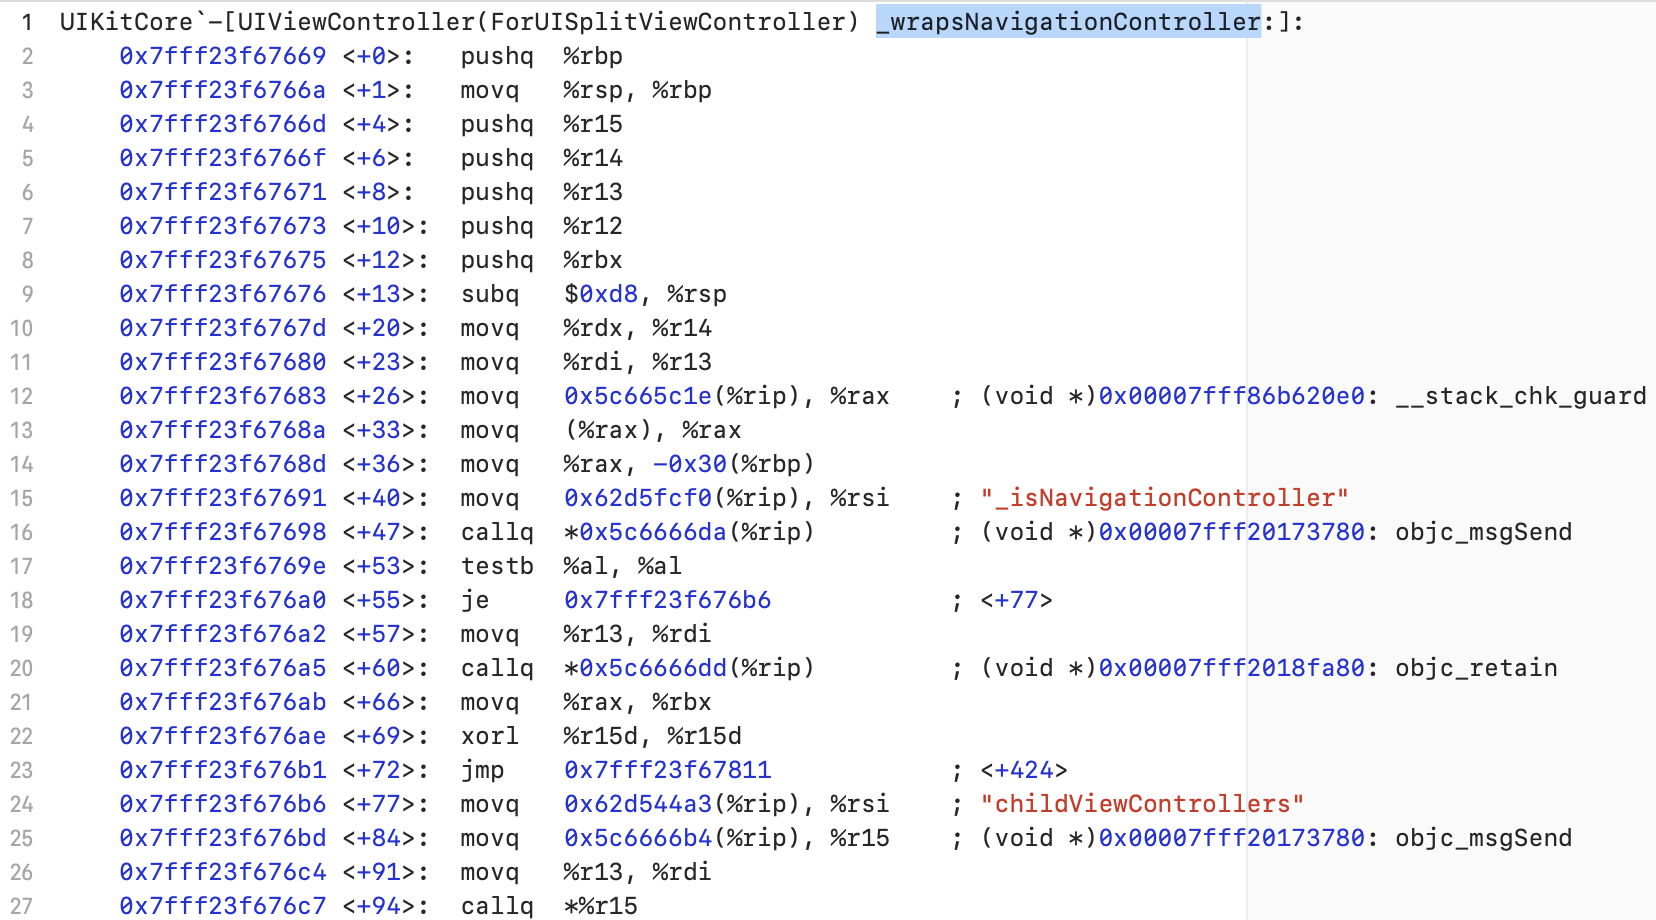
As the documentation states, the primary column view controller's child view controllers are checked, and if the first one is a navigation controller, then UISplitViewController does not wrap the view controller in a navigation controller. This leaves us free to manage the menu's navigation controller ourselves if we so choose.
Unfortunately, There's a Catch
It was all just a bit too good to be true. For the simple case described above, UISplitViewController behaves exactly how we'd expect, and the primary column is laid out correctly. However, things start to become a bit unstuck if we push a view controller on to the navigation stack managed by the navigation controller inside our primary column view controller. If, having pushed a view controller, the user rotates their device or hides then shows the primary column using the display mode bar button, bad things happen:
What's happening here is that having pushed a view controller on to the navigation controller, UISplitViewController is no longer managing the safe area insets of our primary column view controller correctly like it does when it creates the navigation controller itself. Instead, the leading safe area inset is set to 0, meaning that our primary column view controller's content is laid out using the full width of the view, 100 points of which is positioned offscreen. Disaster!
Resolving the Layout Problem
Fortunately, there is a solution to this problem (and it is available on GitHub). We have identified what the problem is, so now we just need to figure out how to resolve it. We start by creating a subclass of UISplitViewController that will modify the default split view controller behaviour. Next, we need a function that we can use to calculate the correct safe area insets for our primary column view controller:
private func correctHorizontalSafeAreaInsets(forPrimaryColumnView primaryColumnView: UIView) -> UIEdgeInsets {
    let requiredHorizontalSafeAreaInset = primaryColumnView.bounds.width - primaryColumnWidth

    /// Create the `primaryColumnView` frame in the split view's coordinate
    /// space.
    let convertedPrimaryColumnViewFrame = view.convert(primaryColumnView.bounds, from: primaryColumnView)

    if convertedPrimaryColumnViewFrame.origin.x < 0 {
        /// The primary column view is positioned to the left of the split
        /// view, so we need to adjust its left safe area inset to
        /// compensate.
        return UIEdgeInsets(top: 0, left: requiredHorizontalSafeAreaInset, bottom: 0, right: 0)
    } else if convertedPrimaryColumnViewFrame.maxX > view.bounds.maxX {
        /// The primary column view is positioned to the right of the split
        /// view, so we need to adjust its right safe area inset to
        /// compensate.
        return UIEdgeInsets(top: 0, left: 0, bottom: 0, right: requiredHorizontalSafeAreaInset)
    }
    return .zero
}
This function begins by calculating the correct value for the safe area inset. This is done by subtracting the split view's primaryColumnWidth from our primary column view's width, which gives us the amount by which the primary column has been extended to support the rubber-banding behaviour described above. We could hard code this to the 100 points that we saw earlier, but this would be making an assumption about an implementation detail of UISplitViewController that we are not in control of. Apple may decide in future to change the amount that the primary column is extended by, so it is safer to calculate the correct value rather than assume it.
Next we check to see if the primary column is positioned to the left or right hand side of the split view. If the user uses a right-to-left language then the split view is laid out with its primary column on the right, not the left, so it is important to consider this here. If the primary column is positioned to the left, then we return edge insets with the left value set. If the primary column is positioned to the right, then we return edge insets with the right value set.
Now we need a function to apply these insets to the primary column:
private func applyCorrectSafeAreaInsets(to viewController: UIViewController) {
    let correctHorizontalSafeAreaInsets = self.correctHorizontalSafeAreaInsets(forPrimaryColumnView: viewController.view)

    if viewController.view.safeAreaInsets.left != correctHorizontalSafeAreaInsets.left {
        viewController.additionalSafeAreaInsets.left = 0
        viewController.additionalSafeAreaInsets.left = correctHorizontalSafeAreaInsets.left - viewController.view.safeAreaInsets.left
    } else if viewController.view.safeAreaInsets.right != correctHorizontalSafeAreaInsets.right {
        viewController.additionalSafeAreaInsets.right = 0
        viewController.additionalSafeAreaInsets.right = correctHorizontalSafeAreaInsets.right - viewController.view.safeAreaInsets.right
    }
}
We take the insets that we calculated earlier and compare them to the safe area insets in our view controller's view. If the view's safe area insets are not the correct value then we reset the view controller's additional safe area inset and apply a new inset to the view controller in order to give the view the correct inset.
We don't always need to perform these calculations, however. If the split view is collapsed, or the primary column is off screen then we can save ourselves the calculation work. To this end, we finish by creating a new function to encapsulate this behaviour:
private func applyCorrectLayoutIfNeeded(toPrimaryColumnViewController primaryColumnViewController: UIViewController) {
    guard !isCollapsed, view.bounds.intersects(primaryColumnViewController.view.frame) else {
        /// The primary column view controller's view is not visible, so
        /// we do not need to make any adjustments.
        return
    }

    applyCorrectSafeAreaInsets(to: primaryColumnViewController)
}
This is the complete code for configuring the safe area insets of our primary column - we just need to figure out when to call it. An obvious place would appear to be viewDidLayoutSubviews:
override func viewDidLayoutSubviews() {
    super.viewDidLayoutSubviews()
    guard let primaryColumnViewController = viewController(for: .primary) else { return }
    applyCorrectLayoutIfNeeded(toPrimaryColumnViewController: primaryColumnViewController)
}
This would work if it weren't for the fact that the split view controller API for accessing the primary column appears to contain a bug. During initial layout, it correctly reports our PresentersMenuViewController as the primary column view controller. However, after a view controller has been pushed on to the menu's child navigation controller, the split view controller API starts returning the child navigation controller of our presenters menu view controller, rather than the presenters menu view controller itself. As such, this code will apply insets to the wrong view controller.
Instead, the simplest solution to this problem is to monitor the frame of the primary column view controller using KVO. Each time the frame changes, we make sure that the safe area insets are configured correctly:
private var primaryColumnFrameKVOToken: NSKeyValueObservation?

override func setViewController(_ vc: UIViewController?, for column: UISplitViewController.Column) {
    super.setViewController(vc, for: column)
    guard column == .primary, let viewController = vc else { return }

    primaryColumnFrameKVOToken = viewController.view.observe(\.frame) { [weak self, weak viewController] (_, _) in
        guard let viewController = viewController else { return }
        self?.applyCorrectLayoutIfNeeded(toPrimaryColumnViewController: viewController)
    }
}
We register our observer when the primary column is set on the split view controller. Now, whenever our primary column's frame changes, we ensure that the safe area is correct:
Departure of the Display Mode Button
You may have noticed that after applying our fix, the primary column's layout is now correct but the display mode button has mysteriously gone missing when showing the primary column after it has been hidden. Although it appears to be gone, the view debugger shows us that it is in fact positioned correctly:
The issue is that the button's alpha is set to 0. We can resolve this issue by marking the navigation bar as needing an extra layout pass, as it is during layout that the alpha value of the bar button is set. All we need to do is update the function we wrote earlier for applying the correct layout to the primary column view controller:
private func applyCorrectLayoutIfNeeded(toPrimaryColumnViewController primaryColumnViewController: UIViewController) {
    guard !isCollapsed, view.bounds.intersects(primaryColumnViewController.view.frame) else {
        /// The primary column view controller's view is not visible, so
        /// we do not need to make any adjustments.
        return
    }

    applyCorrectSafeAreaInsets(to: primaryColumnViewController)
    if let childNavigationController = primaryColumnViewController.children.first as? UINavigationController {
        /// Mark the navigation bar as needing layout to ensure that a
        /// fresh layout pass occurs, which makes sure that
        /// `displayModeButtonItem` is visible.
        childNavigationController.navigationBar.setNeedsLayout()
    }
}
Now our primary column lays out correctly in all scenarios, and the display mode button is always visible. Our fix is complete!
Or is it?
Unfortunately, There's Another Catch
Sorry, it's not going to be quite that easy. There is one more very subtle issue to fix.
If a view controller has been pushed on to our presenters menu child navigation controller, and the user swipes up to reveal the dock, the layout breaks again:
If we set a breakpoint in viewSafeAreaInsetsDidChange inside our presenters menu, we get the following stack trace:
* thread #1, queue = 'com.apple.main-thread', stop reason = breakpoint 1.1
  * frame #0: 0x0000000107314984 SplitViewMenu`PresentersMenuViewController.viewSafeAreaInsetsDidChange(self=0x00007f8d9080c7a0) at PresentersMenuViewController.swift:38:9
    frame #1: 0x00000001073149fb SplitViewMenu`@objc PresentersMenuViewController.viewSafeAreaInsetsDidChange() at <compiler-generated>:0
    frame #2: 0x00007fff24baa047 UIKitCore`-[UIView _safeAreaInsetsDidChangeFromOldInsets:] + 64
    frame #3: 0x00007fff24baa22b UIKitCore`-[UIView _setSafeAreaInsets:updateSubviewsDuringNextLayoutPass:] + 469
    frame #4: 0x00007fff23f351c0 UIKitCore`-[UIViewController _updateViewSafeAreaInsetsAndEagerlyUpdateContentScrollView:] + 133
    frame #5: 0x00007fff23f359da UIKitCore`-[UIViewController _setContentOverlayInsets:andLeftMargin:rightMargin:] + 891
    frame #6: 0x00007fff23f3658c UIKitCore`-[UIViewController __updateContentOverlayInsetsWithOurRect:inBoundsOfAncestorViewController:viaImmediateChildOfAncestor:] + 1090
    frame #7: 0x00007fff23f37520 UIKitCore`-[UIViewController _updateContentOverlayInsetsFromParentIfNecessary] + 1073
    frame #8: 0x00007fff23f43939 UIKitCore`-[UIViewController _recursiveUpdateContentOverlayInsetsFromParentIfNecessary] + 63
    frame #9: 0x00007fff23f439cf UIKitCore`-[UIViewController _recursiveUpdateContentOverlayInsetsFromParentIfNecessary] + 213
    frame #10: 0x00007fff23f439cf UIKitCore`-[UIViewController _recursiveUpdateContentOverlayInsetsFromParentIfNecessary] + 213
    frame #11: 0x00007fff23f4388e UIKitCore`-[UIViewController _sceneSettingsSafeAreaInsetsDidChangeForWindow:] + 82
    frame #12: 0x00007fff246b5e30 UIKitCore`-[UIWindow _sceneSettingsSafeAreaInsetsDidChange] + 126
    frame #13: 0x00007fff23cac5ba UIKitCore`__155-[_UIWindowSceneStatusBarSettingsDiffAction _performActionsForUIScene:withUpdatedFBSScene:settingsDiff:fromSettings:transitionContext:lifecycleActionType:]_block_invoke + 240
    frame #14: 0x00007fff2413afe7 UIKitCore`+[BSAnimationSettings(UIKit) tryAnimatingWithSettings:actions:completion:] + 871
    frame #15: 0x00007fff2424dab2 UIKitCore`_UISceneSettingsDiffActionPerformChangesWithTransitionContext + 240
    frame #16: 0x00007fff23cac41a UIKitCore`-[_UIWindowSceneStatusBarSettingsDiffAction _performActionsForUIScene:withUpdatedFBSScene:settingsDiff:fromSettings:transitionContext:lifecycleActionType:] + 531
    frame #17: 0x00007fff23acf034 UIKitCore`__64-[UIScene scene:didUpdateWithDiff:transitionContext:completion:]_block_invoke + 797
    frame #18: 0x00007fff23acdade UIKitCore`-[UIScene _emitSceneSettingsUpdateResponseForCompletion:afterSceneUpdateWork:] + 253
    frame #19: 0x00007fff23acec6d UIKitCore`-[UIScene scene:didUpdateWithDiff:transitionContext:completion:] + 208
    frame #20: 0x00007fff2416385f UIKitCore`-[UIApplicationSceneClientAgent scene:handleEvent:withCompletion:] + 502
    frame #21: 0x00007fff25a7e8c7 FrontBoardServices`-[FBSScene updater:didUpdateSettings:withDiff:transitionContext:completion:] + 530
This shows the safe area insets of our presenters menu being updated in response to the user interacting with the dock. The problem for us here is that the split view controller is bypassed entirely and does not receive a similar message. As such, there is no method that we can override in order to customise the safe area insets of our menu.
But all is not lost. Instead, we can add another KVO observer, this time on our primary column view controller's view's safeAreaInsets property:
primaryColumnSafeAreaInsetsKVOToken = viewController.view.observe(\.safeAreaInsets) { [weak self, weak viewController] (_, _) in
    guard let viewController = viewController else { return }
    guard viewController.view.safeAreaInsets.left == 0, viewController.view.safeAreaInsets.right == 0 else { return }
    self?.applyCorrectLayoutIfNeeded(toPrimaryColumnViewController: viewController)
}
Here we check if the horizontal safe area has been set back to 0. If it has, we call in to our layout correction function to re-apply the correct insets.
And, with that, we are finally done 🤯
Conclusion
The Human Interface Guidelines for Sidebars state that you should "refrain from exposing more than two levels of hierarchy within a sidebar". This is good advice, and for the vast majority of sidebars a single level hierarchy will suffice. Moreover, if you do require two levels of hierarchy in your sidebar, everything will Just Work™ if you allow UISplitViewController to manage the navigation controller for you, as it does by default. However, if you do need to manage your own navigation controller and you have more than one level of navigation hierarchy, then UISplitViewController does not quite behave correctly. In this scenario, the fix detailed above will provide the behaviour that your users expect. Head on over to the GitHub repo to grab the code if you need it.