Supporting 3D Touch "Peek and Pop"
Supporting specific hardware features that ship with iOS devices is one of the primary benefits of developing completely native applications. By taking advantage of the latest hardware that Apple ships you make your app in to a first-class citizen on the platform. When more applications take the time to utilise these new hardware components it acts as encouragement for users to upgrade their devices, which supports the whole iOS ecosystem. It is also a great way to make your applications stand out from the competition.
When Apple shipped the iPhone 6s and 6s Plus last September, the major new hardware feature was the 3D Touch capable screen. This screen allows for pressure sensitivity to be read and utilised by applications running on the phone. While there are many possibilities that are opened up by this type of interaction, today we will focus on the simplest and most easily implemented - Peek and Pop.
Introduction to Peek and Pop
Peek and Pop is an interaction model where a user presses on an on-screen element, where a tap would usually perform a transition to display some new content. For example, when tapping on an email in the Mail app, the tapped message is presented to the user. With Peek and Pop, the user can press on the message to "Peek" in to it and see a preview of the content. By pushing slightly harder on the screen, the message that the user is peeking at is then "Popped" in to place i.e transitioned to as if the user had selected the mail message by tapping on it.
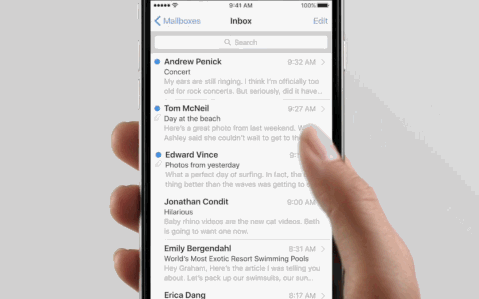
The benefit here is that the user can quickly peek at a message by simply pressing on it to see a preview. If they are not interested in its contents, they can remove their finger from the screen, and the message is dismissed. This is much quicker than opening the message fully, then reaching for the back button on the left of the navigation bar.
Fortunately for us, creating a similar interaction model in our own apps requires very little code, giving us great hardware support for very little effort. Let's take a look at how to do that.
Implementing Peek and Pop
In order to allow our content to be previewed using a Peek gesture we need to conform to UIViewControllerPreviewingDelegate in the view controller that the user will be transitioning from i.e the controller managing the content that can be peeked in to. This protocol has just two functions:
func previewingContext(previewingContext: UIViewControllerPreviewing, viewControllerForLocation location: CGPoint) -> UIViewController? {
    guard let indexPath = collectionView.indexPathForItemAtPoint(collectionView.convertPoint(location, fromView: view)), let cell = collectionView.cellForItemAtIndexPath(indexPath) else {
        return nil
    }

    let countyViewController = storyboard?.instantiateViewControllerWithIdentifier("CountyViewController") as! CountyViewController
    countyViewController.county = County.allCounties[indexPath.item]
    countyViewController.delegate = self
    countyViewController.preferredContentSize = CGSize(width: 0, height: 360)
    previewingContext.sourceRect = collectionView.convertRect(cell.frame, toView: collectionView.superview!)
    return countyViewController
}
This function requests a view controller to use for the Peek part of the interaction. We simply configure a view controller form our storyboard and return it, but we could also create a view controller entirely in code - Peek and Pop is not dependent on storyboards.
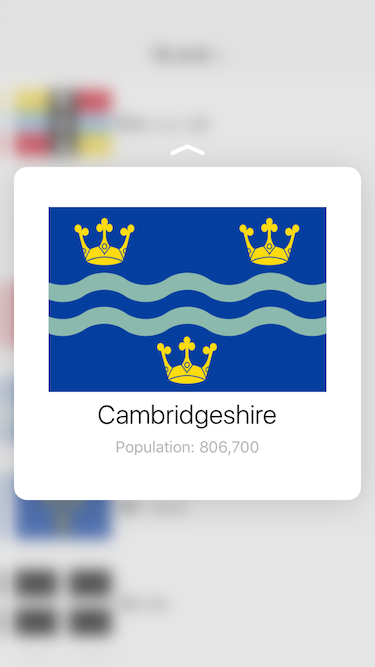
Note too that we set the preferred content size on the preview view controller. This is because the content of the view is quite small, so we can reduce the size that it is presented as during a peeking preview (providing a width of here tells iOS to use whatever default it likes). We also set the sourceRect property on the previewing content, which tells iOS which area of the interface should remain crisp during the animation to the Peek preview, while the rest is blurred.
That's the Peek part of the interaction handled, but what about the Pop?
func previewingContext(previewingContext: UIViewControllerPreviewing, commitViewController viewControllerToCommit: UIViewController) {
    let navigationController = UINavigationController(rootViewController: viewControllerToCommit)
    showViewController(navigationController, sender: self)
}
Here we are asked for the view controller to be shown when user decides to Pop in to the previewed content. We are passed the view controller we created earlier for the Peek part of the interaction, so we just show this in a navigation controller, which is how it would be presented if the user had just tapped on the county rather than peeking in to it. If we like we can return two different view controllers in these methods, allowing for more customised peeking experiences.
Once this is done we simply need to register our view controller as the previewing delegate, which we do like so:
override func viewDidLoad() {
    super.viewDidLoad()
    if traitCollection.forceTouchCapability == .Available {
        registerForPreviewingWithDelegate(self, sourceView: view)
    }
}
Before registering we check to see if force touch is available, as it is only present currently on the iPhone 6s and 6s Plus, and even then can be disabled in the Settings app.
So how does it look? With this code we have Peeking:
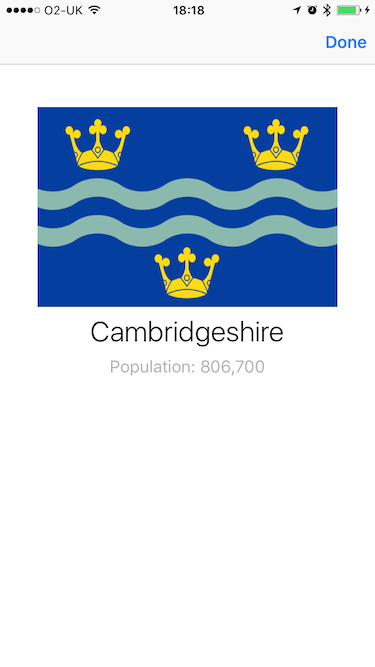
From here, if the user presses harder we pop in to our content:
It's worth noting that you can also support peek and pop without writing this code, but by instead using interface builder (as of Xcode 7.1). Selecting an existing segue will present the following options:
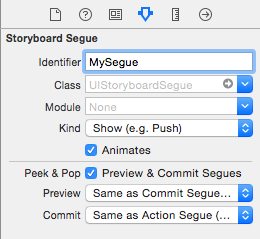
Checking the Peek & Pop checkbox will give you support for peeking and popping to the destination view controller of the segue. Note that the preview and commit segues can be customised to modify the presentation when using Peek and Pop. This is a great way to easily support peek and pop with no code whatsoever. The minimum deployment target of apps configured for Peek and Pop through Interface Builder is iOS 9.1.
Preview Actions
Preview actions are a set of activities that the user can perform when at the previewing "Peek" stage of the Peek and Pop interaction. While Peeking, if the user swipes up then the preview is animated upwards and a set of actions are shown:
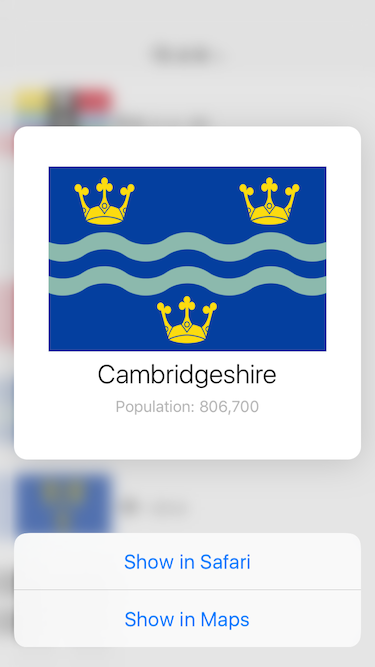
Once again, taking advantage of this feature requires very little code:
lazy var previewActions: [UIPreviewActionItem] = {
    let safariAction = UIPreviewAction(title: NSLocalizedString("Show in Safari", comment: ""), style: .Default, handler: { (previewAction, viewController) -> Void in
        // Code for launching Safari omitted
    })

    let mapsAction = UIPreviewAction(title: NSLocalizedString("Show in Maps", comment: ""), style: .Default, handler: { (previewAction, viewController) -> Void in
        // Code for launching Maps omitted
    })

    return [safariAction, mapsAction]
}()
We supply the actions in the view controller that is used for displaying the preview during the Peek interaction. This allows users to interact with their content in a fast and fluid fashion.
A Note on Testing in the Simulator
Currently 3D Touch can only be tested using a device that supports it in its hardware. However, the current beta of Xcode 7.3 allows the use of the Magic Trackpad, or the trackpad built in to the latest MacBooks, to simulate 3D Touch gestures.
Conclusion
Today we have seen just how easy it is to support 3D Touch in your apps to provide great Peek and Pop experiences for your users. You can add support in your apps quickly and easily, in some cases with no code at all, to make your applications feel right at home on iOS. The next time you're adding features to your apps, consider how this interaction model could be used to enhance the overall user experience. Download the sample project to try it for yourself.