Uploading App Store dSYMs to Firebase with GitHub Actions
Back in 2015, Apple introduced Bitcode, which allows Apple to re-optimise an app's binary without the need to submit a new version. With bitcode enabled, your app is compiled and linked on the App Store during submission. Because of this, new dSYMs are generated after your app is submitted, which need to be uploaded to your crash-tracker of choice in order that crashes on customer devices can be correctly symbolicated. Today, we will be looking at how to upload these App Store dSYMs to Firebase via a job run using GitHub Actions.
Authentication
dSYMs can be downloaded from App Store Connect using the App Store Connect API. In order to authenticate with these APIs, we require an API key to be generated with at least the Developer-level role assigned to it. Instructions on how to create these keys can be found here. Once this key has been generated, it can be downloaded as a .p8 key file. We now have the 3 pieces of information that we need to be able to authenticate with App Store Connect: The Key ID of our key, our key's Issuer ID, and the private key itself, encoded in a .p8 file.
Next, we need to add these as secrets to the GitHub repository that we use to host our app. We do this by navigating to the repository on GitHub, then going to Settings > Secrets > Actions, and clicking the "New repository secret" button. Add the API key's Key ID to a secret named KEY_ID, and add the Issuer ID to a secret named ISSUER_ID. For the private key itself, run the following command in your terminal:
pbcopy < path/to/private_key.p8This copies the contents of the .p8 file to the system pasteboard. Add a new repository secret named AUTHORISATION_P8, and paste the contents of the pasteboard as the secret's value. The secret should start with -----BEGIN PRIVATE KEY----- and end with -----END PRIVATE KEY-----.
Now that we have our authentication credentials configured, let's see how we can use them to create a token used to grant access to the App Store Connect API.
Token Script
In order to authenticate with the App Store Connect API, we need to generate an ES256 JWT containing our private key's Key ID, Issuer ID, as well as the contents of our private key. We will do this by placing the following Ruby script in to a scripts folder in the root directory of our repository:
require "jwt"

if ARGV.length != 3
  puts "Incorrect arguments. Script should be passed the issuer id, key id, and path to the authentication key P8 file."
  exit
end

issuer_id = ARGV[0]
key_id = ARGV[1]
p8_path = ARGV[2]

private_key = OpenSSL::PKey.read(File.read(p8_path))

token = JWT.encode(
  {
    iss: issuer_id,
    exp: Time.now.to_i + 20 * 60,
    aud: "appstoreconnect-v1"
  },
  private_key,
  "ES256",
  header_fields={
    kid: key_id
  }
)

puts token
This script takes a private key's Issuer ID, Key ID, and the path to a .p8 file containing the private key as parameters. It then uses the JWT framework to generate a JWT containing these details. The token has an expiry date set to 20 minutes in the future, and also has the token's audience set to appstoreconnect-v1. We now have a token that we can use to authenticate with the App Store Connect API.
Workflow
We now have our credentials configured and a mechanism for generating an authentication token to access App Store Connect. The final piece of the puzzle is to create a GitHub workflow to download our app's dSYMs and upload them to Firebase.
Before adding this workflow we need to add one more repository secret. In order to download app dSYMs, we need to know which app's dSYMs to download. Apps are identified in the App Store Connect API using the app's Apple ID, which you can find by logging in to App Store Connect, clicking "My Apps", selecting the app whose dSYM uploads you are automating, then selecting "App Information" from the General menu, then copying the value displayed underneath the "Apple ID" heading. Store this value in a repository secret named APP_ID.
Now that we have all of our secrets configured, we can add a new workflow to our repository in its .github/workflows directory:
name: Upload dSYMs to Firebase

on:
  workflow_dispatch:
    inputs:
      versionNumber:
        description: 'The version number of the app whose dSYMs should be uploaded to Firebase'
        required: true

jobs:
  printInputs:
    name: Download dSYMs
    runs-on: ubuntu-latest

    steps:
      - name: Checkout
        uses: actions/checkout@v2
      - name: Download dSYMs
        run: |
          echo "$AUTHORISATION_P8" > AuthorisationP8.p8
          token=$(ruby scripts/token.rb $ISSUER_ID $KEY_ID AuthorisationP8.p8)
          dsyms_url=$(curl -s "https://api.appstoreconnect.apple.com/v1/builds?filter[processingState]=VALID&filter[app]=$APP_ID&filter[version]=${{ github.event.inputs.versionNumber }}&include=buildBundles" -H "Authorization: Bearer ${token}" | jq '.included[] | .attributes.dSYMUrl' -r)
          curl -s "$dsyms_url" --output appDsyms.zip
        env:
          ISSUER_ID: ${{ secrets.ISSUER_ID }}
          KEY_ID: ${{ secrets.KEY_ID }}
          AUTHORISATION_P8: ${{ secrets.AUTHORISATION_P8 }}
          APP_ID: ${{ secrets.APP_ID }}
      - name: Upload dSYMs to Firebase
        run: |
          unzip -q appDsyms.zip -d appDsyms
          scripts/crashlytics-upload-symbols -gsp "path/to/your/GoogleService-Info.plist" -p ios appDsyms
      - name: Retain dSYMs Zip
        uses: actions/upload-artifact@v2
        with:
          name: dSYMs
          path: appDsyms.zip
          retention-days: 5
Notice that our workflow is triggered by workflow_dispatch - this means that it is triggered manually through the GitHub UI. It also takes a single parameter named versionNumber, which is the version number of the app whose dSYMs we wish to upload to Firebase.
Our job contains four steps:
Step 1 - Checkout
This step simply checks out the repository.
Step 2 - Download dSYMs
This is where the bulk of the job's work occurs. We start by taking the contents of the .p8 file from the repository's secrets and write it to a file so that its path can be passed, along with the Key and Issuer IDs, to the JWT creation script that we created earlier. Having generated an API token using our repository secrets, we use curl to make the App Store Connect API call. This API call uses the List Builds service to get a list of our app's builds. We filter this list so that it only contains builds with a processingState of VALID, contains builds for our app as identified using the APP_ID from our repository secrets, and that have the version number as identified by the version number entered when the workflow was triggered. We also specify, via the include parameter, the buildBundles value. This tells the API that we want information about the build's bundle included with the returned build details, which we require as the build bundle contains a URL that locates the dSYMs for the build.
We pass the data downloaded by curl to jq, which we use to access the value of the included array, which contains the build bundles as we requested earlier. We then access the attributes object from the build bundle, and read its dSYMUrl property. This property contains a URL from which we can download our build's dSYMs, and we store it in a variable named dsyms_url. We then download the contents of this URL and save it in a file named appDsyms.zip.
Step 3 - Upload dSYMs to Firebase
In this step we unzip the dSYMs that we downloaded in the previous step in to a directory named appDsyms. Next, it uses the Crashlytics upload symbol tool (stored in the scripts directory and named crashlytics-upload-symbols) to upload the unzipped dSYMs. Note that we also pass the location of the GoogleService-Info.plist that the app uses to send crash reports to Firebase - this allows Firebase to know which app the dSYMs correspond to.
Step 4 - Retain dSYMs Zip (Optional)
This step stores the dSYMs that we downloaded previously for 5 days. This allows them to be inspected or distributed manually if needed. If you do not require this then this step can be omitted.
Triggering the Workflow
Now that our workflow is configured, we can run it by going to our repository on GitHub, clicking the Actions tab, and selecting the "Upload dSYMs to Firebase" job. From there, all we need to do is click the "Run workflow" button, type in the version number of our app whose dSYMs we wish to upload to Firebase, and click the green "Run workflow" button:
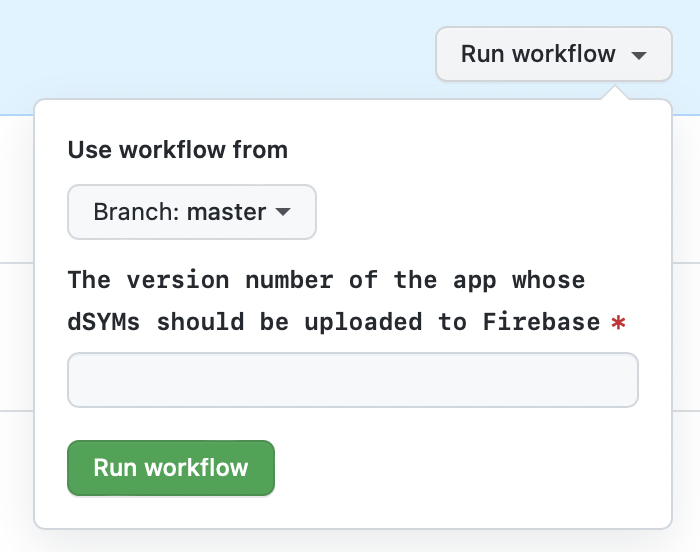
Our dSYMs will then be downloaded from App Store Connect and uploaded to Firebase.
Conclusion
Automating your app's dSYM uploads to Firebase simplifies a long-winded manual process that has to be run after each release of your app. This saves time for developers, and means that systems access does not have to be managed for multiple developers to allow them to perform this process. Instead, dSYM uploads become as simple as typing a version number and clicking a couple of buttons. All that is required is the maintenance of a single access key in your repository's secrets 🎉.