Advanced Multi-window UIs on iPadOS with Drag & Drop and State Restoration
WWDC 2019 saw the introduction of a new operating system - iPadOS - for iPad. The first features of iPadOS listed on Apple's webpage that distinguish it from iOS are Slide Over, Split View, Apps in Multiple Spaces, and App Exposé. All of these features are powered by iPadOS's multi-window user interface, and today we are going to explore how to leverage these features in your apps using the powerful new "scene" APIs introduced with iPadOS. You will see that with a relatively small architectural change, your app will benefit from multi-window support. With a little bit more work, your app can support multiple scenes to support the various different workflows of your power users. Let's get started!
Setting the Scene
Before we delve in to the code, let's first get up to speed with some of the terminology and classes that we will need to understand to start building multi-window support in our apps.
- UIScene - Each instance of your application's user interface is represented by an individual
UISceneobject. When your app runs full screen or floating on top of another app in Slide Over, its UI will be presented by a singleUIScene. When the user creates new instances of your app's UI, it will receive a new scene for each new window (specifically aUIWindowScene). The behaviour of the scene is primarily customised via its delegate property. - UISceneDelegate / UIWindowSceneDelegate -
UISceneDelegateis the delegate protocol to conform to when responding to lifecycle events of a particular instance of your app's UI in a scene e.g when the scene transitions between foreground and background states.UIWindowSceneDelegateconforms toUISceneDelegateand provides additional opportunities to customise the behaviour of your UI when it is presented in a window scene e.g responding to application shortcuts. - UISceneSession - Each one of your application's scenes is managed by a
UISceneSessionobject. The session contains information about the scene, such as identifiers and user activities used when restoring a scene if the app has been terminated. The session also contains a reference to aUISceneConfiguration. - UISceneConfiguration - This configuration object contains the details used by UIKit to construct your scenes. For simple multi-window support, your application's scene is configured using an entry in your application's Info.plist. For more advanced scene support, you will create scene configurations programatically (more on this later).
You can think of UISceneConfiguration as being the recipe that iPadOS uses to construct your application's scenes. For windowed user interfaces, UIWindowScene is the default scene class that is used. Each scene represents part of your application's UI presented in some form of window, and each scene has an associated UISceneSession used to manage the lifecycle of the scene along with restoration of the scene should the app be terminated and relaunched.
With all of that out of the way, let's begin the process of upgrading an existing app to support a multi-window user interface.
Adopting Scenes in an Existing iPad App
The process of upgrading your app to support multiple windows is relatively straightforward. As an example, we will walk through the process of updating the Counties sample app to support multiple windows, the code for which is available on GitHub.
First of all, we need to create a new object to be the delegate of our application's main scene. The primary responsibility of this object will be to take functionality that currently resides in the app delegate and implement it here instead. This is because when an app's UI can be spread across multiple windows, features such as responding to application shortcuts or opening Universal URLs must be handled by an individual scene, which is not the responsibility of the app delegate, but of a scene delegate. The app delegate will no longer be responsible for managing any part of the app's UI.
In order to be a delegate for our application's window scene, we must create an object that conforms to UIWindowSceneDelegate. As our app's root view controller is called MasterViewController, we will create a window scene delegate called MasterSceneDelegate, and have it conform to UIWindowSceneDelegate. As the scene delegate also needs to be part of the responder chain, our delegate must inherit from UIResponder:
class MasterSceneDelegate: UIResponder {
    var window: UIWindow?
}

extension MasterSceneDelegate: UIWindowSceneDelegate {}
Note the window property on our object, which takes the place of the window property that exists in the app delegate. Our scene now manages a window's content, so the window property of the app delegate is redundant.
Next we need to update the Info.plist file so that iPadOS knows that we support multiple windows, and also how to construct our app's UI:
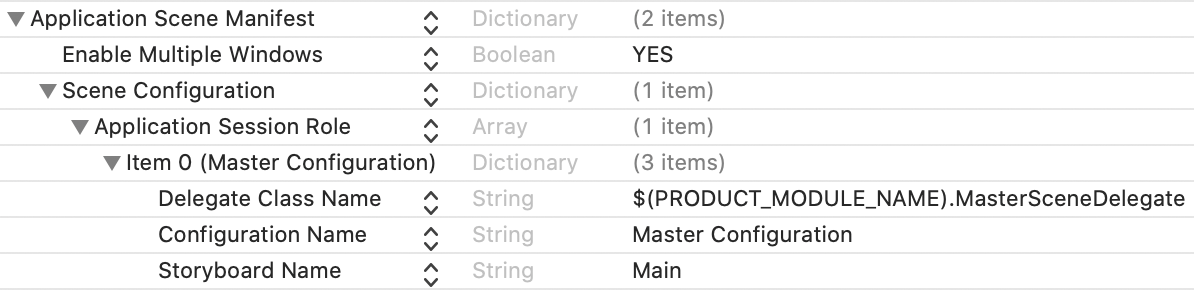
There are two important parts to consider in these plist entries. The first is "Enable Multiple Windows" being set to "YES", which is fairly self explanatory. The second is the "Scene Configuration", which corresponds to a UISceneConfiguration object described earlier. Here we are providing the name of the scene delegate class that we created as well as the name of the storyboard containing the MasterViewController that is used to display the main user interface of the app.
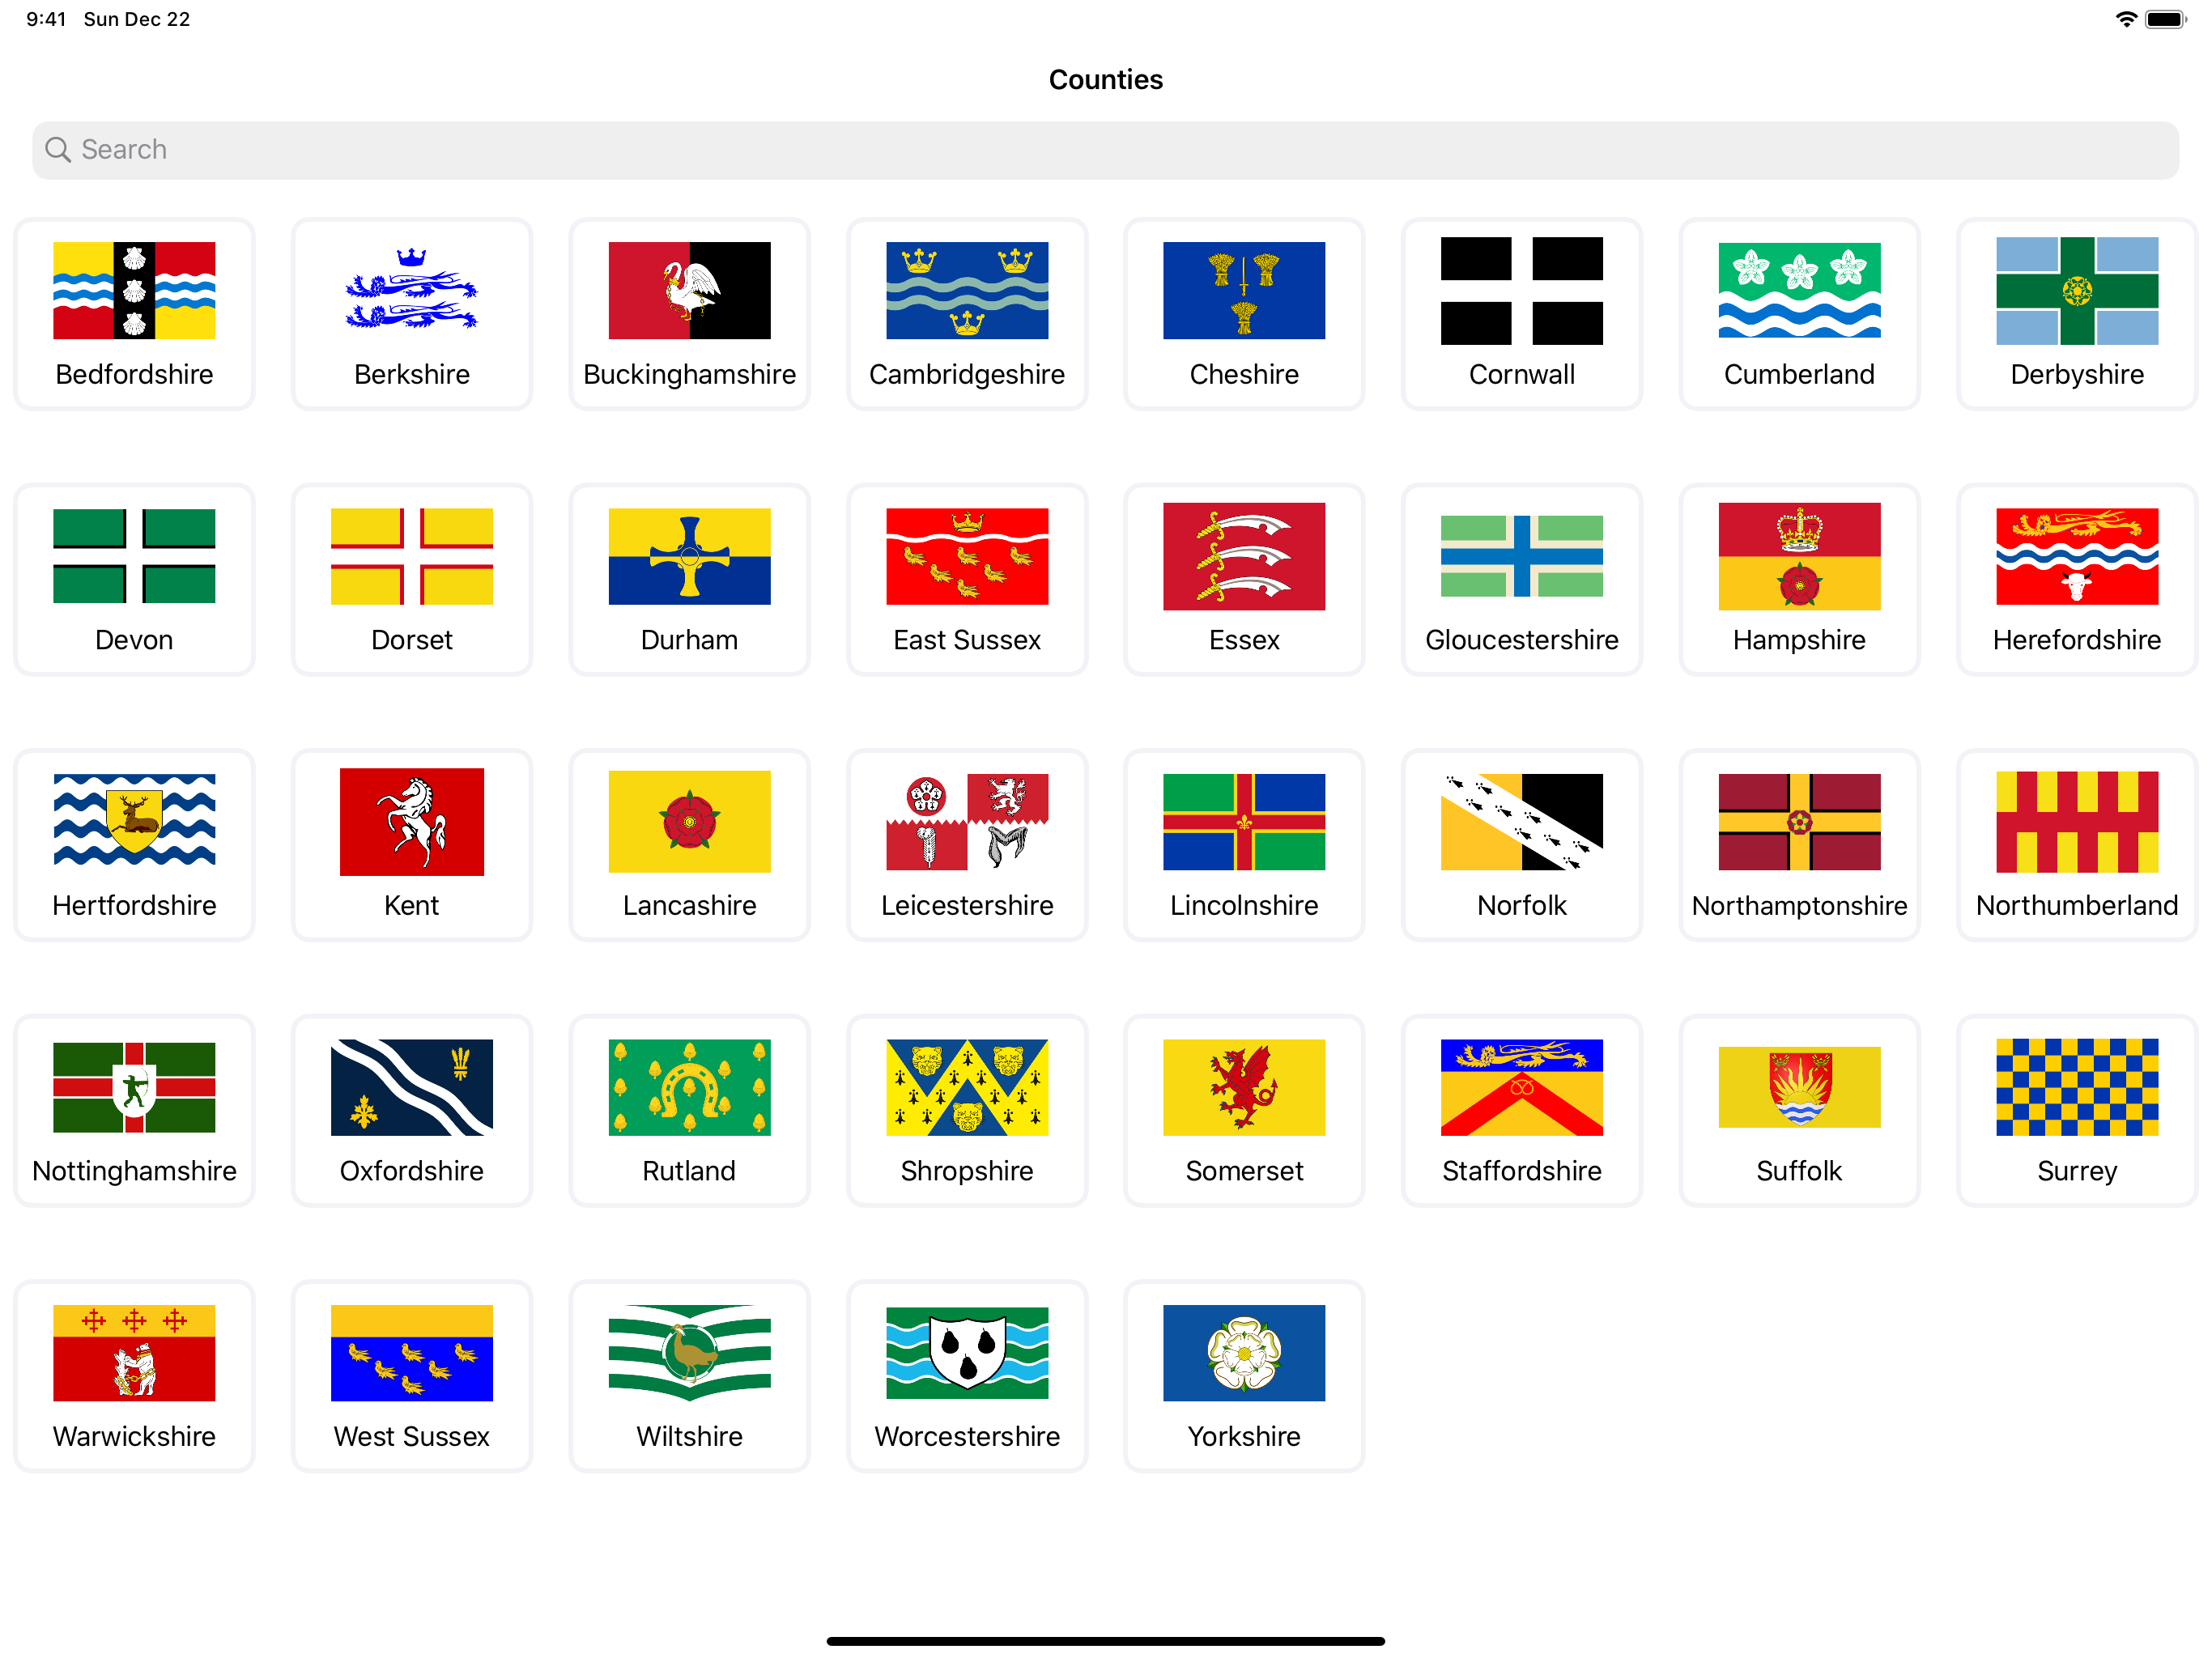
If we build and run the app now, we see the exact same user interface we had before making any changes. The only difference is that now our UI is being displayed using a scene, rather than being managed by the app delegate:
So, have we achieved nothing with these changes? No! Users can now launch our app in multiple windows:
Users can now use App Exposé to see multiple windows of our app, so they can see the details of more than one county at a time by simply launching a new window.
Streamlining the App Delegate
As mentioned before, the scene delegate takes over some of the responsibilities that used to fall to the app delegate. Currently the app delegate looks like this:
@UIApplicationMain
class AppDelegate: UIResponder, UIApplicationDelegate {
    var window: UIWindow?
    private let spotlightController = SpotlightController()
    private let userActivityHandlers: [UserActivityHandling]
    private var applicationShortcutHandler: ApplicationShortcutHandler?

    override init() {
        userActivityHandlers = [spotlightController, HandoffController(), SpotlightQueryContinuationHandler()]
        super.init()
    }

    func application(_ application: UIApplication, didFinishLaunchingWithOptions launchOptions: [UIApplication.LaunchOptionsKey: Any]?) -> Bool {
        spotlightController.indexCounties(County.allCounties)
        if let navigationController = window?.rootViewController as? UINavigationController, let masterViewController = navigationController.topViewController as? MasterViewController {
            applicationShortcutHandler = ApplicationShortcutHandler(masterViewController: masterViewController)
        }
        return true
    }

    func application(_ application: UIApplication, continue userActivity: NSUserActivity, restorationHandler: @escaping ([UIUserActivityRestoring]?) -> Void) -> Bool {
        // Code removed for brevity
    }

    func application(_ application: UIApplication, performActionFor shortcutItem: UIApplicationShortcutItem, completionHandler: @escaping (Bool) -> Void) {
        // Code removed for brevity
    }
}
Our app delegate is responsible for configuring the MasterViewController as well as handling Handoff via NSUserActivity and Application Shortcuts. It also owns the individual handlers for supporting these features, and manages the Spotlight Search Controller used to support continuing Spotlight Searches in the app. The pertinent parts of UIApplicationDelegate for these responsibilities are:
optional func application(_ application: UIApplication, didFinishLaunchingWithOptions launchOptions: [UIApplication.LaunchOptionsKey: Any]?) -> Bool

optional func application(_ application: UIApplication, continue userActivity: NSUserActivity, restorationHandler: @escaping ([UIUserActivityRestoring]?) -> Void) -> Bool

optional func application(_ application: UIApplication, performActionFor shortcutItem: UIApplicationShortcutItem, completionHandler: @escaping (Bool) -> Void)
Mercifully, all of these responsibilities can now be passed to our scene delegate instead. We can find corresponding functions in UIWindowSceneDelegate, which are:
optional func scene(_ scene: UIScene, willConnectTo session: UISceneSession, options connectionOptions: UIScene.ConnectionOptions)

optional func scene(_ scene: UIScene, continue userActivity: NSUserActivity)

optional func windowScene(_ windowScene: UIWindowScene, performActionFor shortcutItem: UIApplicationShortcutItem, completionHandler: @escaping (Bool) -> Void)
Here is a snippet of our MasterSceneDelegate handling these features for us:
class MasterSceneDelegate: UIResponder {
    var window: UIWindow?
    private let spotlightController = SpotlightController()
    private var applicationShortcutHandler: ApplicationShortcutHandler?
    private let userActivityHandlers: [UserActivityHandling]

    override init() {
        userActivityHandlers = [spotlightController, HandoffController(), SpotlightQueryContinuationHandler()]
        super.init()
    }
}

// MARK: UIWindowSceneDelegate
extension MasterSceneDelegate: UIWindowSceneDelegate {
    func scene(_ scene: UIScene, willConnectTo session: UISceneSession, options connectionOptions: UIScene.ConnectionOptions) {
        if let navigationController = window?.rootViewController as? UINavigationController, let masterViewController = navigationController.topViewController as? MasterViewController {
            applicationShortcutHandler = ApplicationShortcutHandler(masterViewController: masterViewController)
        }
    }

    func scene(_ scene: UIScene, continue userActivity: NSUserActivity) {
        // Code removed for brevity
    }

    func windowScene(_ windowScene: UIWindowScene, performActionFor shortcutItem: UIApplicationShortcutItem, completionHandler: @escaping (Bool) -> Void) {
        // Code removed for brevity
    }
}
The code from -[UIApplicationDelegate application:didFinishLaunchingWithOptions:] has been moved almost verbatim to -[UISceneDelegate scene:willConnectToSession:options:], and the user activity and application shortcut handlers have been moved to the similarly named functions.
What does our app delegate look like now? It looks like this:
@UIApplicationMain
class AppDelegate: UIResponder, UIApplicationDelegate {
    private let spotlightController = SpotlightController()

    func application(_ application: UIApplication, didFinishLaunchingWithOptions launchOptions: [UIApplication.LaunchOptionsKey : Any]? = nil) -> Bool {
        spotlightController.indexCounties(County.allCounties)
        return true
    }
}
That's it - everything from the previous implementation has been removed, other than a single call to our Spotlight indexer at launch. As app delegates are common victims of bloating by having to support too many application features, being able move some of them to a different object provides welcome relief.
So far we have adopted basic multi-window support. It's worth noting that even if you don't intend to support multiple windows, it is worth transitioning to using a scene delegate anyway in order to alleviate some of the burden on your app delegate. By setting "Enable Multiple Windows" to "NO" in the Info.plist, our app's behaviour would revert to the single window paradigm that existed before iPadOS, but we would keep our slimmed down app delegate.
With the basics done, let's take a look at some more advanced multi-window features, specifically providing different window scenes for different parts of our app's content.
Multiple Scene Support
By default, multi-window apps allow users to spawn new application windows that all show the same application user interface i.e each window contains your app's full UI. But what if you want to be able to show a subset of your application's data in a window, for example a window specifically for a detail view? Fortunately this is entirely possible, and we can build this on top of the concepts that we have explored so far already.
Firstly, you will need to decide which parts of your application you think warrant being able to have their own window to display their content. In our Counties app we have a simple master menu showing a list of counties, and a detail view showing the details for a particular county. As users may want to be able to compare different counties side by side, we're going to extract the County details UI and allow it to be shown in its own window scene. This is a two step process:
1. Extract the Existing County View UI
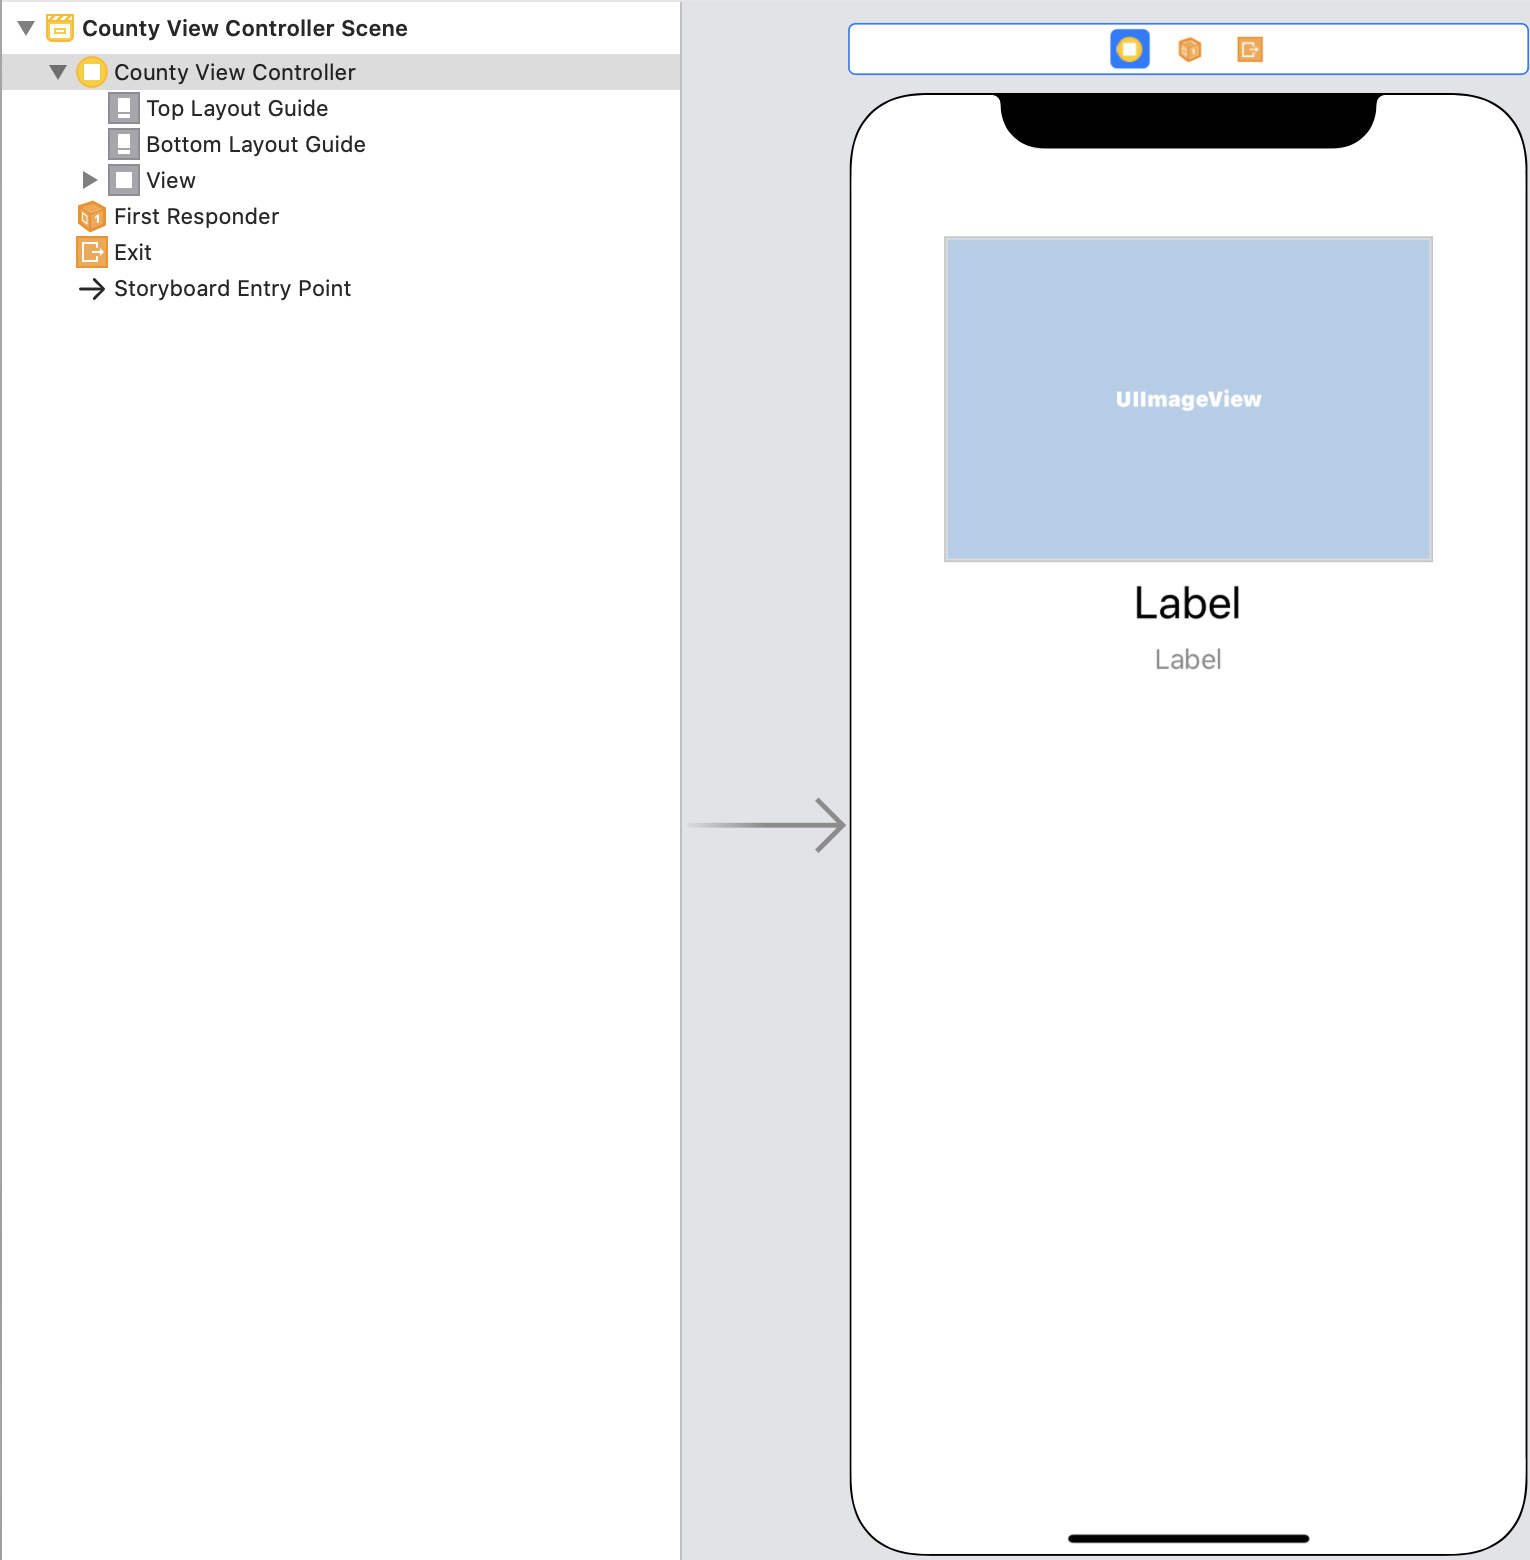
Our application's UI is managed by a single storyboard which looks like this:
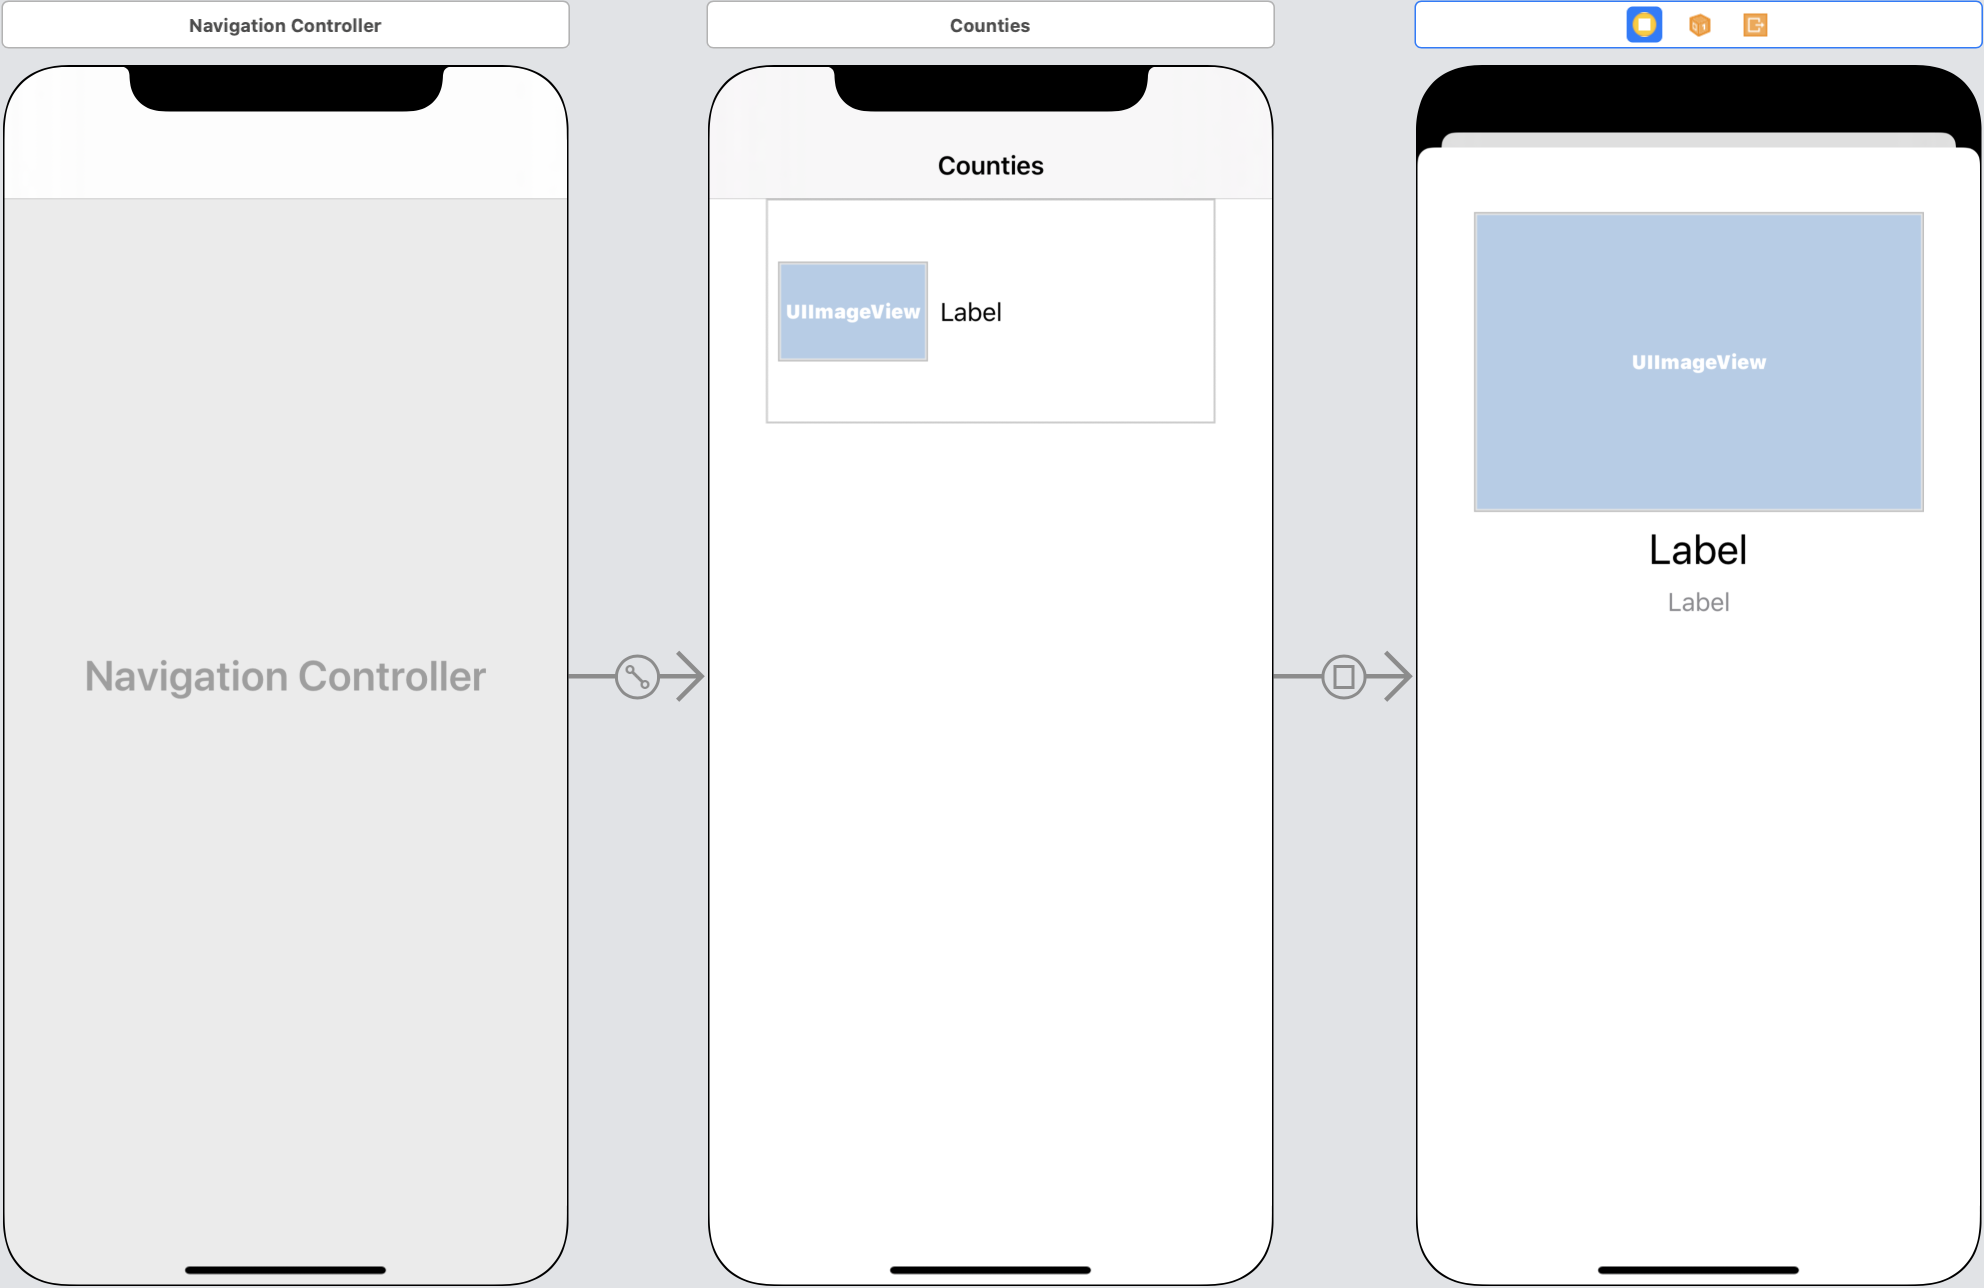
Here we have a master UINavigationController with our MasterViewController as its root (the centre view controller with 'Counties' as its title). The master view controller then has a segue that presents our CountyViewController, which is triggered when the user taps on one of the counties. It is this final view controller that we wish to use in our County scene, but we do not want to duplicate it in another storyboard as we would then have two configurations that we would have to maintain. Fortunately, we can extract this view controller to its own storyboard and have our existing Main.storyboard reference the new storyboard to avoid such duplication. To do this, we select the CountyViewController, go to the Xcode menu bar and select "Editor > Refactor to Storyboard...". We then save the new storyboard as CountyViewController.storyboard - we now have our county view defined in its own storyboard that can be used by itself and is also referenced by Main.storyboard.
Make sure that the view controller is set to be the storyboard's "initial view controller", otherwise using this storyboard on its own won't display any UI.
2. Create a County Scene Delegate
Now that we have successfully extracted the county details view, we need to be able to configure it when it is presented as the root UI of a new window. In order to do this, we need to create another scene delegate. This time, we will call our delegate CountySceneDelegate, which like our MasterSceneDelegate will inherit from UIResponder and conform to UIWindowSceneDelegate:
class CountySceneDelegate: UIResponder {
    var window: UIWindow?
}

// MARK: UIWindowSceneDelegate
extension CountySceneDelegate: UIWindowSceneDelegate {
    func scene(_ scene: UIScene, willConnectTo session: UISceneSession, options connectionOptions: UIScene.ConnectionOptions) {
        guard let county = County.from(userActivity: connectionOptions.userActivities.first),
            let countyViewController = window?.rootViewController as? CountyViewController else { return }
        countyViewController.county = county
        scene.title = county.name
    }
}
The county to be displayed in the scene will be provided via an NSUserActivity (more on this later), which we get access to from the UIScene.ConnectionOptions supplied as a parameter to -[UISceneDelegate scene:willConnectToSession:options:]. Once we have extracted the county details from the user activity we use it to configure the view. Note that we also set the scene's title to the name of the county. This allows the county name to be displayed above the window in the App Exposé UI, which is a nice extra touch to add if, like here, you have suitable content to use as the scene's title.
OK, now we have everything we need to be able to show county details in their own window. But how do we create a new window with just a county? When creating new windows with an app's content, we do so by dragging and dropping part of the UI to the side of the screen, which causes iPadOS to request a new window scene for the dragged content. We will explore how to do this next.
Adding Drag & Drop to the County Menu
Our master county menu is implemented using UICollectionView. Fortunately for us, UICollectionView has built in support for Drag & Drop via a special dragDelegate property. We set the master view controller to be the drag delegate like this:
collectionView.dragDelegate = UIApplication.shared.supportsMultipleScenes ? self : nilThe reason for checking UIApplication.shared.supportsMultipleScenes is simple - we only want to add the drag and drop gestures to our collection view on iPadOS, where dragging of counties can be used to spawn new windows. iPhones do not support creating multiple scenes per app, and as our app also runs on iOS, we don't want to enable drag and drop where it won't be useful.
Next we need to make our master view controller conform to UICollectionViewDragDelegate. We do this with an extension containing a single function:
extension MasterViewController: UICollectionViewDragDelegate {
    func collectionView(_ collectionView: UICollectionView, itemsForBeginning session: UIDragSession, at indexPath: IndexPath) -> [UIDragItem] {
        guard let county = dataSource.itemIdentifier(for: indexPath) else { return [] }
        let itemProvider = NSItemProvider()
        itemProvider.registerObject(county.userActivity, visibility: .all)
        return [UIDragItem(itemProvider: itemProvider)]
    }
}
We are doing a few things here. First, we find the county that corresponds to the index path of the collection view cell that the user dragged. Next, we create an NSUserActivity that represents the county and register it with an NSItemProvider object. Finally, we create a UIDragItem with the item provider and return it.
That's all we need to do to support the Drag part of the gesture - now we need to support the Drop by creating a scene for the dragged county.
Creating Scenes Programatically
So far, iPadOS has created our app's scenes for us using the configuration we provided in the Info.plist file. However, in order to support different kinds of scenes in our app, we have to create the scenes ourselves in our app delegate. To do this, we start by removing the scene configuration we added to the Info.plist, leaving just the part that specifies that we support multiple windows:

Once we have removed the master scene configuration from the Info.plist, we need to add it to our app delegate instead:
func application(_ application: UIApplication, configurationForConnecting connectingSceneSession: UISceneSession, options: UIScene.ConnectionOptions) -> UISceneConfiguration {
    let masterConfiguration = UISceneConfiguration(name: "Master Configuration", sessionRole: connectingSceneSession.role)
    masterConfiguration.delegateClass = MasterSceneDelegate.self
    masterConfiguration.storyboard = UIStoryboard(name: "Main", bundle: nil)
    return masterConfiguration
}
This is simply duplicating what we had previously in the Info.plist. Note that during development, in order to pick up the change we just made, you will need to delete the app from your development device or simulator and install it again as iPadOS appears to cache the Info.plist scene configuration and so won't call in to your app delegate for the scene configuration.
Building and running the app now shows no change in behaviour, and dragging & dropping a county doesn't create a new window with our dragged county's details. This is because we still aren't configuring the new scene to use the county details UI. Thankfully we only need a small change to our app delegate to achieve this:
func application(_ application: UIApplication, configurationForConnecting connectingSceneSession: UISceneSession, options: UIScene.ConnectionOptions) -> UISceneConfiguration {
    if County.from(userActivity: options.userActivities.first) != nil {
        let countyConfiguration = UISceneConfiguration(name: "County Configuration", sessionRole: connectingSceneSession.role)
        countyConfiguration.delegateClass = CountySceneDelegate.self
        countyConfiguration.storyboard = UIStoryboard(name: "CountyViewController", bundle: nil)
        return countyConfiguration
    }
    let masterConfiguration = UISceneConfiguration(name: "Master Configuration", sessionRole: connectingSceneSession.role)
    masterConfiguration.delegateClass = MasterSceneDelegate.self
    masterConfiguration.storyboard = UIStoryboard(name: "Main", bundle: nil)
    return masterConfiguration
}
Our app delegate is passed the same UIScene.ConnectionOptions as our scene delegates are given when they are connected to a scene. Just like we did in the CountySceneDelegate, we can check these options to see if they contain an NSUserActivity that corresponds to a county. If they do, we create a UISceneConfiguration that uses the CountySceneDelegate that we created earlier as the scene's delegate, and uses the CountyViewController storyboard that we extracted from Main.storyboard.
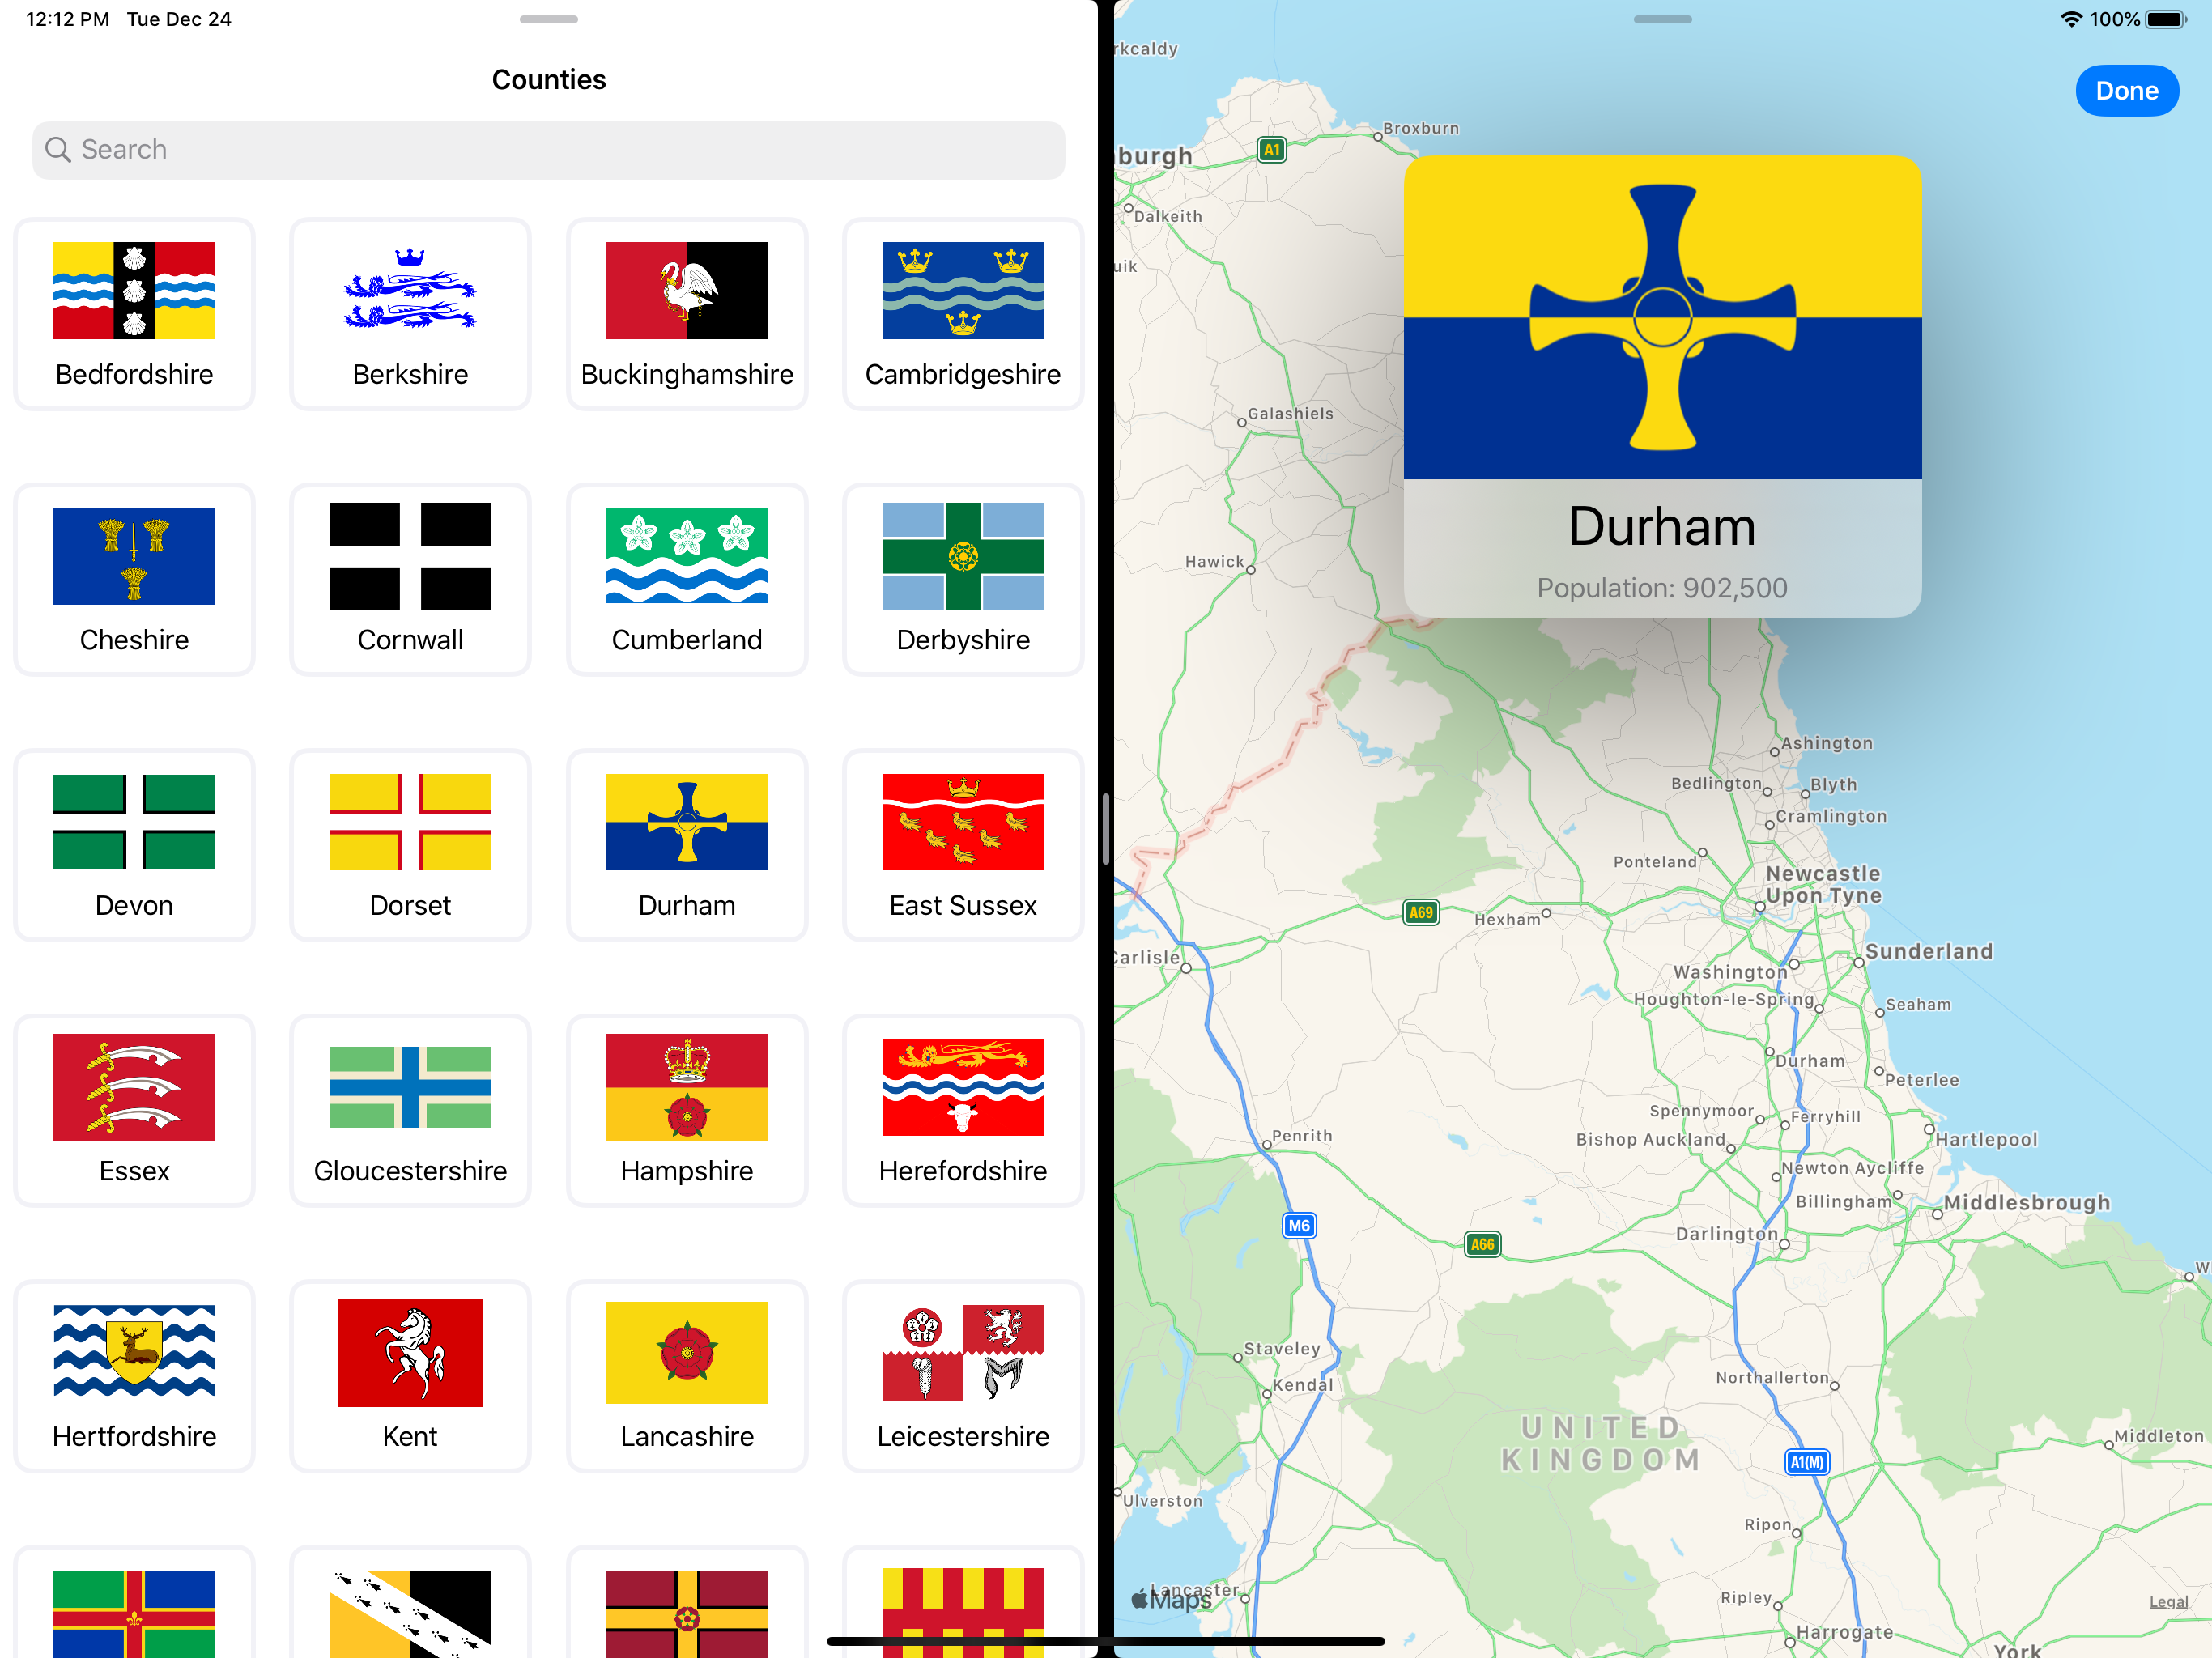
Now we have configured both ends of the Drag & Drop gesture. When the user drags a county cell from the master view we package up an NSUserActivity describing the dragged county. When the user drags the cell to the edge of the screen, iPadOS creates a new window scene and asks our app delegate for a scene configuration. We return a configuration with the storyboard and scene delegate of our choosing, and the magic of creating a customised content-based window scene is complete:
Programatic Scene Dismissal
Now that we can show county details in a separate window scene, we need a way to allow the user to dismiss the window when they are finished with it. CountyViewController has been built with a good old-fashioned delegate, containing a single function:
/*
The protocol for delegates of the county view controller to conform to.
*/
protocol CountyViewControllerDelegate: AnyObject {
    /*
    The function called when the county view controller wants to dismiss.
    - parameter countyViewController: The county view controller sending the message.
    */
    func countyViewControllerDidFinish(_ countyViewController: CountyViewController)
}
The countyViewControllerDidFinish: message is sent to the controller's delegate when the user taps the pill-shaped "Done" button in the view's upper trailing corner. Our MasterViewController conforms to CountyViewControllerDelegate and responds to countyViewControllerDidFinish: by dismissing the county view controller that it has presented in response to the user tapping on a county. However, when the county details are being shown in their own window scene, the scene itself needs to be dismissed rather than the view controller. We can do this easily enough by adding CountyViewControllerDelegate conformance to our CountySceneDelegate object:
extension CountySceneDelegate: CountyViewControllerDelegate {
    func countyViewControllerDidFinish(_ countyViewController: CountyViewController) {
        guard let sceneSession = countyViewController.view.window?.windowScene?.session else { return }
        UIApplication.shared.requestSceneSessionDestruction(sceneSession, options: nil, errorHandler: nil)
    }
}
Here we access the scene session associated with the window scene displaying our county view controller, and we make a request to UIApplication.shared to destroy the scene. Of course, in order to receive this message, we need our CountySceneDelegate to be the delegate of the county view controller in the scene. We can do this simply by modifying the CountySceneDelegate's implementation of -[UIWindowSceneDelegate scene:willConnectToSession:options:] and adding countyViewController.delegate = self.
Now the user can dismiss the county details window by tapping the "Done" button:
State Restoration
You may have thought at this point that our journey to multi-window joy is over, but unfortunately you'd be wrong. Say a user has been viewing a county's details in Split View, like this:
If the user then backgrounds the app, and the app is subsequently terminated by iPadOS, the next time the user launches the app, they will be presented with the following:
Good heavens, that's no good! Just what's going on here?
The reason why we are presented with a county details window with no county details on display is because we did not persist the details of the county that the user was viewing before the app terminated. As such, when the app is relaunched, a county scene is reconstructed without any county information, so the county view controller is not configured. Happily for all involved, there is a solution to this problem, and that solution is State Restoration.
We need a way to record the county that the user was viewing in the window scene, and have it persist across app launches. As UIScene objects are subclasses of UIResponder, they contain a userActivity property. We can make use of this to assign the county that the user is viewing to the scene that owns the CountyViewController. We do this by modifying the view controller as follows:
override func viewDidAppear(_ animated: Bool) {
    super.viewDidAppear(animated)
    view.window?.windowScene?.userActivity = county?.userActivity
}

override func viewWillDisappear(_ animated: Bool) {
    super.viewWillDisappear(animated)
    view.window?.windowScene?.userActivity = nil
}
We are simply making use of the same user activities to represent counties as we have previously used when creating a new county window scene, which are the same user activities used for Spotlight indexing and Handoff support.
The only other change we have to make is to our CountySceneDelegate, which needs to include an implementation of -[UISceneDelegate stateRestorationActivityForScene:]. Here we simply return the user activity that has been assigned to the county view controller's window's scene:
extension CountySceneDelegate: UIWindowSceneDelegate {
    func scene(_ scene: UIScene, willConnectTo session: UISceneSession, options connectionOptions: UIScene.ConnectionOptions) {
        guard let county = County.from(userActivity: session.stateRestorationActivity ?? connectionOptions.userActivities.first),
            let countyViewController = window?.rootViewController as? CountyViewController else { return }
        countyViewController.county = county
        countyViewController.delegate = self
        scene.title = county.name
    }

    func stateRestorationActivity(for scene: UIScene) -> NSUserActivity? {
        return scene.userActivity
    }
}
Note also that in -[UISceneDelegate scene:willConnectToSession:options:] we are now checking the session.stateRestorationActivity property in order to retrieve the persisted state restoration user activity if one exists.
Now, when the user relaunches the app after termination, it will show any counties that they were viewing previously:

Targeting Application Shortcuts and Spotlight Query Continuation to Specific Scenes
If your application provides shortcuts via the home screen app icon or integrates with Spotlight search, and you have implemented support for different kinds of scene in your app, then you will likely wish to target your application shortcuts and Spotlight interaction handling to specific scenes. For example, in our Counties sample app, we provide an application shortcut to allow the user to initiate a search. However, only our master scene contains a search UI, so we need to make sure that our application shortcuts are handled by the master scene exclusively. Likewise, Spotlight search continuation can also only be handled in the master scene.
In order to achieve such behaviour we need to embark upon a 3 step procedure that involves: identifying the content that the user has interacted with to launch the app; determining the scene best equipped to deal with it; handling the content in the designated scene when the app is brought to the foreground.
1. Identifying Content
There are three kinds of content that now contain a new targetContentIdentifier property - notifications (represented by UNNotificationContent), user activities (represented by NSUserActivity), and application shortcut items (represented by UIApplicationShortcutItem). This new identifier is a string used by the scene routing mechanism to determine which scene is best positioned to respond to an individual piece of content.
To be able to identify our application shortcuts, we need to add a target content identifier to them. For shortcuts defined in our app's Info.plist, this involves adding a new key-value pair using the UIApplicationShortcutItemTargetContentIdentifier key:

For application shortcuts that are created programatically, a UIMutableApplicationShortcutItem should be used, with its targetContentIdentifier set to a useful domain-specific value.
2. Matching Content to Scenes
Now that our shortcuts contain target content identifiers, it is time to associate our content with the master scene. Each UIScene object contains an activationConditions property. This property contains an instance of UISceneActivationConditions, which in turn contains two predicate properties:
@NSCopying open var canActivateForTargetContentIdentifierPredicate: NSPredicate // default is [NSPredicate predicateWithValue:YES]
@NSCopying open var prefersToActivateForTargetContentIdentifierPredicate: NSPredicate // default is [NSPredicate predicateWithValue:NO];
These predicates are used to match against the targetContentIdentifier values we set earlier. The "can activate" predicate is used for matching content that the target scene is capable of showing. The "prefers to activate" predicate is used for matching content that the target scene is best placed to display. You can configure these predicates in order to route particular content to particular scenes currently showing your app's content.
In the case of our counties app, we wish to route all of our user activities to the master scene. We can do this by adding the following line of code to our CountySceneDelegate's implementation of -[UISceneDelegate scene:willConnectToSession:options:]:
scene.activationConditions.canActivateForTargetContentIdentifierPredicate = NSPredicate(value: false)The predicate we are setting as the "can activate" predicate returns false for everything i.e it does not match any target content identifiers. As such, the county scene will never be chosen to perform any of our application shortcuts. As our MasterSceneDelegate still has the default [NSPredicate predicateWithValue:YES] set as its "can activate" predicate, it will be chosen for all of our application shortcut handling.
3. Responding to Content During Scene Activation
Once a window scene has been chosen to handle a user activity, it sends a message to its delegate, which is -[UIWindowSceneDelegate windowScene:performActionForShortcutItem:completionHandler:]. Here we receive the shortcut item that has been routed to the scene delegate, and can handle it appropriately. Spotlight query continuation is handled via a message to -[UISceneDelegate scene:continueUserActivity:].
Conclusion
As we have seen today, adding standard multi-window support to apps running on iPadOS need not be a laborious process. Likewise, by learning a few new concepts introduced by the UIScene APIs, we can unleash the power of fully customised multi-window UIs in our applications. Also, for apps that you are considering transitioning to the Mac using Apple's Mac Catalyst technology, support for multiple window workflows is a must. Introducing them in your iPad app will bring immediate benefits to your current users and give you a head start when brining your app to the Mac. Head over to GitHub to checkout the sample project for yourself, and start to consider how support for multiple windows could help the users of your apps.